
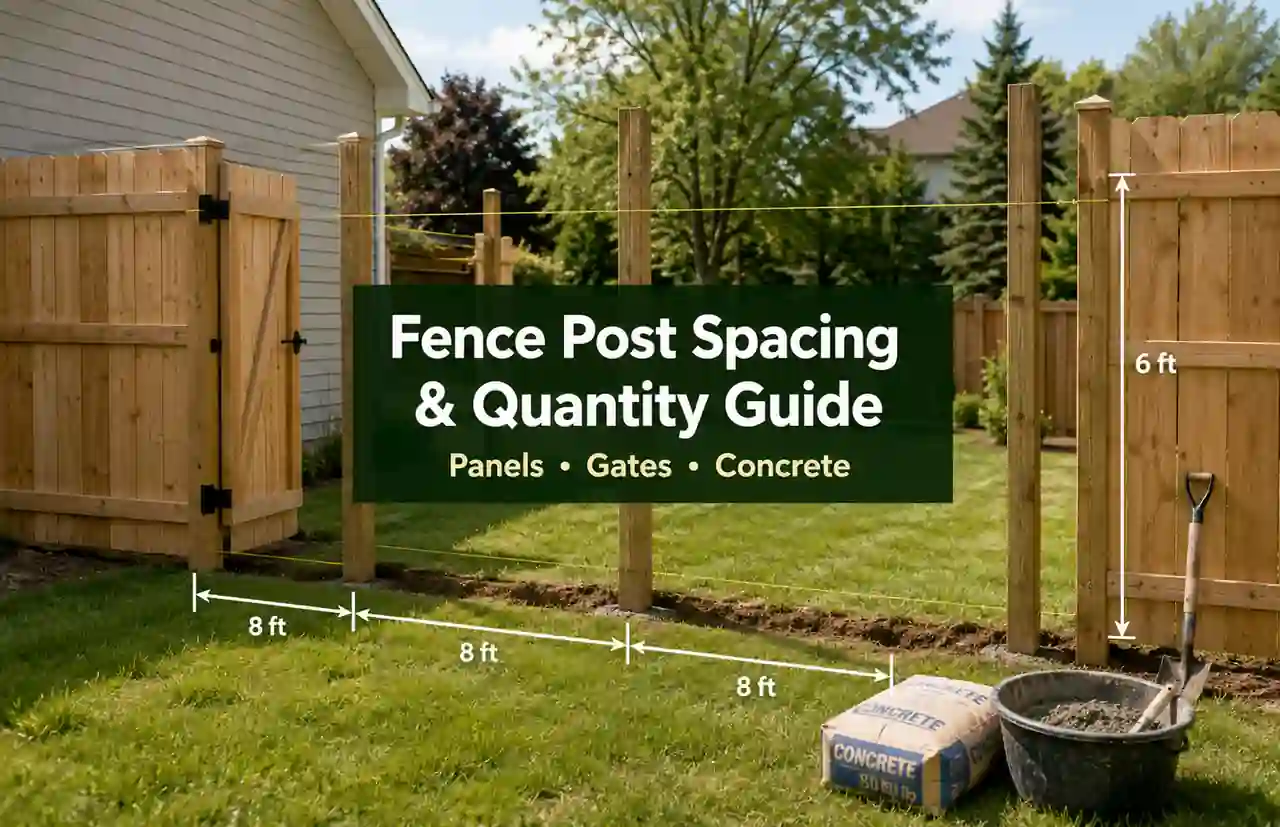
Fence-post maths looks wonderfully simple until the fence acquires a corner, a gate, a panel size that does not match the drawing, or one last bay that is too short to be useful. The basic calculation is still simple, but the useful version is not just “length divided by spacing.” It is a small layout exercise.
This guide shows how to estimate posts for straight runs and closed perimeters, what gates do to the count, why pre-made panels need their own logic, and how to turn post holes into a concrete order. It uses both feet and metres so the same method makes sense whether your supplier talks about 8 ft panels, 1.83 m panels, pickets, palings, boards or mesh.
Quick answer: for a straight fence with no gates, posts = round up (fence length ÷ maximum post spacing) + 1. For a closed loop, the final post is shared with the first, so the post count normally matches the number of intervals. Gates and pre-made panels should be laid out as real intervals rather than added as an afterthought.
Post spacing, post size, hole depth, concrete method and gate support are not universal design values. Fence height, material, wind exposure, soil, frost, slope, local rules and the product manufacturer can all change the required construction. Use this guide for quantity planning, then verify the actual fence system before digging.
Plan the fence before the first hole
Think in Bays, Not Just Metres or Feet
A fence run is a chain of intervals. One interval may contain a panel, a set of pickets, a section of mesh or a gate. Posts sit at the boundaries between those intervals. That is why a straight run with five bays needs six posts: one at the beginning, four between the bays and one at the end.
Straight or open run
Fence bays = round up (net infill length ÷ maximum spacing)
Total intervals = fence bays + gate openings
Posts = total intervals + 1

Closed perimeter
Posts = total intervals

For pre-made panels
Fence bays = round up (net infill length ÷ actual panel or system module width)
Why the same fence length can produce different post counts
| Layout | What happens at the ends | Basic post rule |
|---|---|---|
| Straight run | The first and last post are different posts | Intervals + 1 |
| Closed perimeter | The final interval returns to the starting post | One post per interval |
| Two separate runs | Each run has its own start and finish | Calculate each run separately |
| Run with a gate | The gate is another interval between posts | Keep the gate in the interval count |
Start with the Complete Fence Line
Measure the route the fence will actually follow, not the property area and not the straight-line distance between two points that the fence cannot use. Walk every side of the proposed run, mark corners, record changes in direction and note where gates must sit.
A small sketch prevents large ordering mistakes
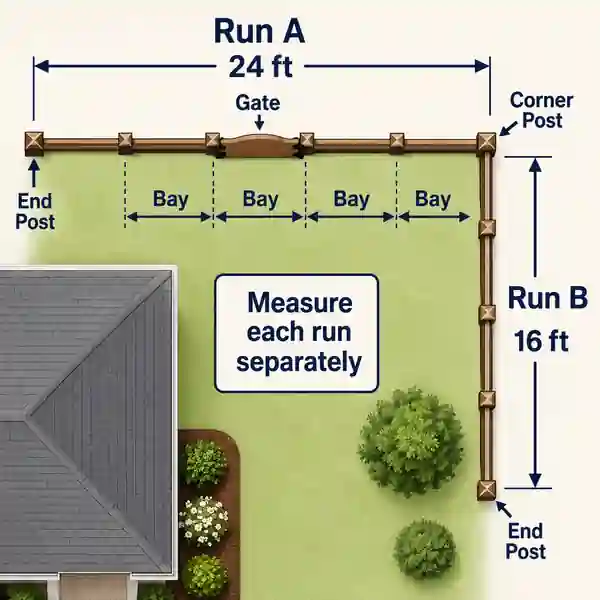
Write a length beside every straight run instead of keeping one unexplained total in your head.
Mark every corner, free end, gate and change of fence type.
If two sides use different panels or different post spacing, calculate them as separate groups.
Keep the sketch until the order is placed; it becomes the easiest way to check where every post is supposed to go.
- Measure along the actual fence route.
- Separate disconnected fence runs.
- Mark corners before choosing the spacing.
- Record gate opening widths, not just gate-leaf widths from a catalogue.
- Check whether the supplier dimensions are panel width, clear opening, outside-to-outside width or post-centre spacing.
- Identify slopes, retaining edges and changes of ground level that may force a different layout.
If the fence line is not yet marked on the ground, use string or temporary stakes before ordering. A ten-minute layout check is cheaper than discovering that the “straight 100 ft run” is actually 96 ft plus a 7 ft return.
Choose Post Spacing from the Fence System
There is no single correct spacing for every fence. A common DIY timber or picket layout in North America may place posts around 6–8 ft apart, while a pre-made panel system may dictate its own module. In Britain, many domestic fence panels are sold around 1.83 m wide, but the post itself can affect the repeated centre-to-centre dimension. Mesh, chain-link, metal and proprietary composite systems can use different spacing again.
Treat these as planning examples, not universal rules
| Fence system | Useful starting information | What must be verified |
|---|---|---|
| Site-built timber or picket fence | A supplier or installer may commonly work around 6–8 ft / 1.8–2.4 m | Fence height, rails, post size, wind exposure and local requirements |
| Pre-made US-style panel | Some products are designed around an 8 ft module | Actual panel width and whether spacing is measured post-to-post or centre-to-centre |
| Pre-made UK-style panel | 1.83 m is a common panel width | Post width, slots, gravel boards and the manufacturer’s complete module |
| Mesh or chain-link | Spacing may be wider than a solid privacy fence | Terminal posts, bracing, tension system and product instructions |
| Gate opening | Not a normal line-post bay | Gate hardware, post section, bracing, clearance and swing or slide space |
A smaller spacing can create more posts without solving a bad product layout. A larger spacing can save posts while creating a fence the selected rails or panels were never designed to span. The spacing belongs to the system, not to the calculator.
Panel width and post spacing are not always the same number
This is one of the easiest mistakes to make when moving between suppliers or countries. A product described as an 8 ft panel may be intended for posts on 8 ft centres. Another system may sell a 1.83 m panel but require the post width to be included in the repeated run. The safe approach is to copy the dimension that the installation instructions actually use.
The supplier's module beats the label on the panel
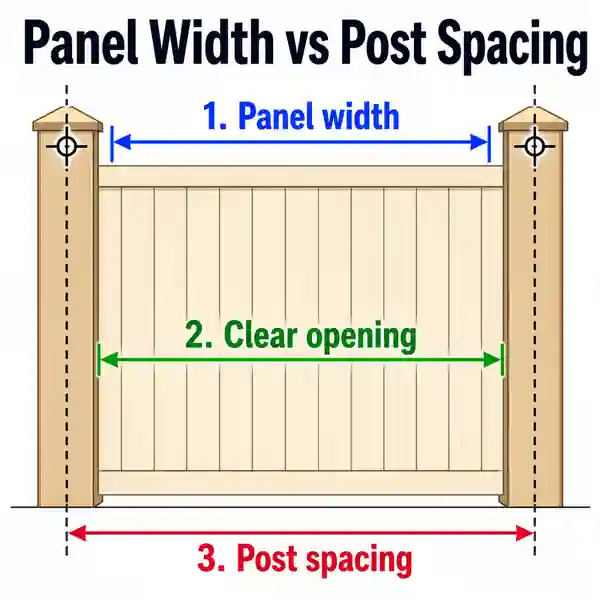
Panel width describes the panel itself.
Clear opening describes the space between posts.
Centre-to-centre spacing includes part of each post and may be the dimension used by a panel system.
Do not mix these three measurements in one calculation.
Worked Example: 100 ft Straight Fence
How many fence posts are needed for a 100 ft straight run with a maximum spacing of 8 ft and no gates?
Answer: Fourteen posts.
Explanation: 100 ÷ 8 = 12.5, so the fence needs 13 bays because the spacing cannot exceed 8 ft. A straight run needs one more post than bays: 13 + 1 = 14 posts. If you distribute the posts evenly, the actual spacing becomes about 7.69 ft rather than leaving one tiny final bay.
Quick straight-run post counts with no gates
| Fence length | Maximum spacing | Bays | Posts |
|---|---|---|---|
| 24 ft | 8 ft | 3 | 4 |
| 40 ft | 8 ft | 5 | 6 |
| 60 ft | 8 ft | 8 | 9 |
| 100 ft | 8 ft | 13 | 14 |
| 150 ft | 8 ft | 19 | 20 |
| 200 ft | 8 ft | 25 | 26 |
The table uses maximum spacing. When the length does not divide evenly, reduce the spacing slightly across all bays instead of building twelve full bays and leaving an awkward short one at the end. The final set-out should still follow the selected fence system and any fixed gate or corner positions.
Worked Metric Example: 30 m Straight Fence
How many fence posts are needed for a 30 m straight run with a maximum spacing of 2.4 m and no gates?
Answer: Fourteen posts.
Explanation: 30 ÷ 2.4 = 12.5, so round up to 13 bays. A straight run needs 14 posts. Evenly distributing the 30 m across 13 bays gives an actual spacing of about 2.31 m.
Quick metric post counts with no gates
| Fence length | Maximum spacing | Bays | Posts |
|---|---|---|---|
| 10 m | 2.4 m | 5 | 6 |
| 15 m | 2.4 m | 7 | 8 |
| 20 m | 2.4 m | 9 | 10 |
| 30 m | 2.4 m | 13 | 14 |
| 40 m | 2.4 m | 17 | 18 |
| 50 m | 2.4 m | 21 | 22 |
Gates Change the Layout Before They Change the Count
A gate removes ordinary fence infill from part of the run, but it does not remove structure. The opening still has boundaries, and those boundaries are posts. For quantity planning, subtract the combined gate width from the length filled with panels, pickets or mesh, then treat each gate opening as its own interval.
A 60 ft straight fence includes one 4 ft gate. The remaining fence uses a maximum 8 ft spacing. What is a simple planning count?
Answer: Nine posts in the HomDera interval method.
Explanation: The ordinary infill length is 60 − 4 = 56 ft. At 8 ft maximum spacing, 56 ft creates 7 fence bays. Add the gate as one structural interval, giving 8 intervals total. A straight run therefore needs 9 posts. The real gate position should still be checked on a sketch because an end gate, paired gates or a special gate frame can change the post-by-post layout.
Place the gate on the sketch before distributing line posts
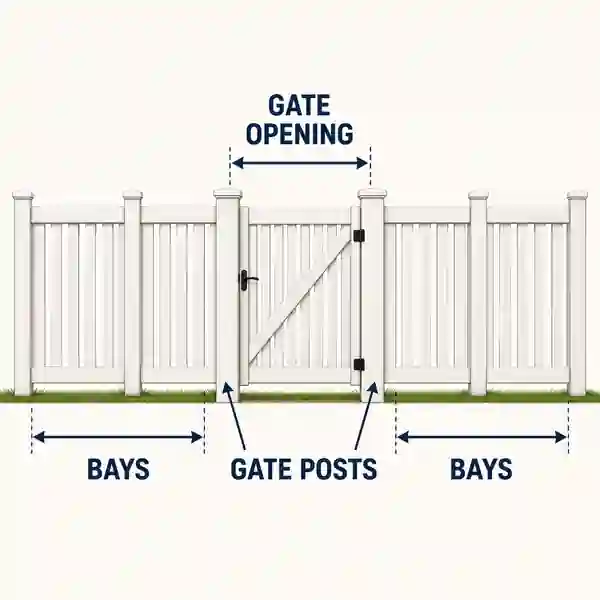
Mark the exact gate opening first.
Treat the gate as a structural interval, not as missing fence length.
Distribute ordinary fence bays on the remaining runs.
Verify whether the gate manufacturer requires larger posts, deeper foundations, bracing or different clearances.
Gate situations that deserve a separate check
| Situation | Why simple arithmetic may be insufficient | Practical check |
|---|---|---|
| Pedestrian gate within a straight run | Two neighbouring posts carry hinges and latch loads | Confirm the opening and gate-post specification |
| Double driveway gate | Leaves, hinges, wind and vehicle clearance increase demands | Use the gate system’s post and footing requirements |
| Sliding gate | The opening is only part of the total space needed | Include the run-back area and support system |
| Gate at the end of a fence | One gate post may also be the terminal post | Draw the post sequence instead of adding generic extras |
| Two gates close together | Shared or closely spaced posts can change the count | Lay out every opening individually |
Do not assume a gate post is just a normal line post in a more exciting location. Gate loads, width, hardware and wind can require a different post, bracing or foundation.
Panels, Pickets and Mesh Need Different Quantity Logic
Post count is only one part of the order. The infill itself is purchased in different units. Pre-made panels are counted as complete sections. Pickets or palings are counted as individual pieces. Mesh is usually purchased by roll length. Mixing those methods is a reliable way to produce a very confident wrong answer.
Match the calculation to the material
| Fence infill | Main quantity input | Purchasing rule |
|---|---|---|
| Pre-made panels or sections | Actual panel or system module width | Round up to complete panels and check the final cut or bespoke section |
| Individual pickets, palings or boards | Board width + intended gap | Count pieces across the net infill length and add a reasoned allowance |
| Mesh or chain-link | Net fence length + joining allowance | Round up to complete rolls |
| Rails for site-built fencing | Fence bays × rails per bay | Check stock lengths and whether rails can span or splice as planned |
A 1.83 m panel does not automatically create a 1.83 m centre spacing
For example, one UK panel manufacturer describes 1.83 m panels used with 100 mm slotted posts and shows a run calculation that adds a nominal 50 mm of post width per panel. The lesson is not that every British fence should use 1.88 m centres; the lesson is that the full installed module comes from the selected system.
An 8 ft panel may be designed for 8 ft post centres
In the US market, some 6 ft × 8 ft timber panels are explicitly intended to hang on 8 ft centres. Other products use different actual dimensions or installation details. Read the installation information for the exact panel rather than treating “8 ft” as a universal fence-post rule.
Before ordering panels, write down four separate values if the supplier provides them: actual panel width, post width, required clearance and post-centre module. The number that controls the layout will become obvious.
Concrete for Fence Posts Is a Volume Problem
Once the number of posts is known, concrete can be estimated from the hole geometry. The HomDera fence calculator uses the full cylindrical hole volume as a purchasing estimate, multiplies it by the number of posts, adds an editable allowance and divides the result by the mixed yield stated for one bag.
Gross volume of one round post hole = π × (hole diameter ÷ 2)² × hole depth

Total hole volume = volume per hole × number of posts

Order volume = total hole volume × (1 + concrete allowance ÷ 100)

Bags to buy = round up (order volume ÷ mixed yield per bag)
Use the mixed-concrete yield printed for the exact bag, not the bag weight alone. A bag sold as 20 kg, 25 kg, 50 lb, 60 lb or 80 lb does not tell you its finished volume without product data.
Diameter changes concrete volume faster than it looks
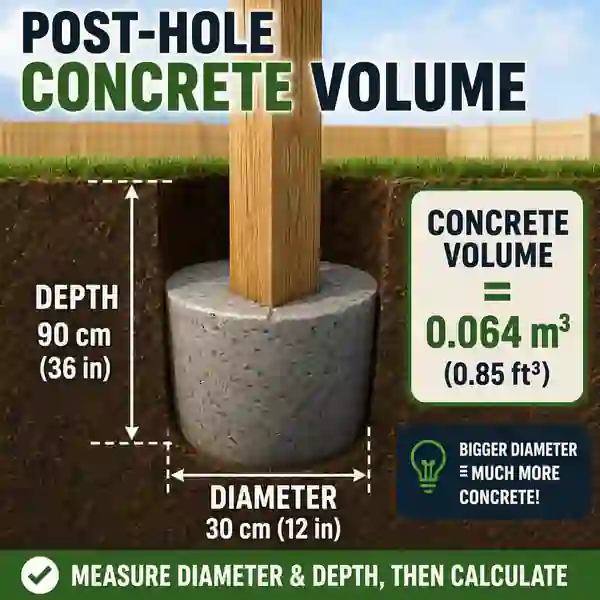
Round holes are cylinders, so volume depends on the square of the radius.
A modest increase in hole diameter can increase the concrete order noticeably.
Measure several holes when the auger wanders, the sides collapse or the soil changes.
Choose hole diameter and depth from the real fence design, not from a convenient calculator default.
What concrete order does a planning example produce for 14 holes that are 10 in in diameter and 30 in deep, with a 10% allowance?
Answer: About 21.0 ft³ of gross concrete volume after the allowance. If the selected bag states a mixed yield of 0.45 ft³, the quantity is 47 complete bags.
Explanation: One cylindrical hole is about 1.364 ft³. Fourteen holes use about 19.09 ft³. Adding 10% gives about 21.00 ft³. Dividing by the example 0.45 ft³ bag yield gives 46.66 bags, rounded up to 47. The 0.45 ft³ value is only an example; copy the yield from the actual product you plan to buy.
This gross-hole method is deliberately simple and conservative because it does not subtract the volume displaced by the embedded post. A separate engineering or supplier method may calculate net concrete differently. The important point is to know which method your estimate uses and not mix assumptions halfway through the order.
Calculate concrete for post holes separatelyPost-Hole Depth Is Not a Universal Fraction
You will often see simple rules such as burying roughly one-third of a post or using a familiar two-foot hole. Those can be useful reminders that posts need meaningful embedment, but they are not universal construction requirements. Frost depth, soil strength, drainage, fence height, wind, gate loads and the footing method can all change the required depth.
Conditions that can change the foundation
| Condition | Why it matters | What to verify |
|---|---|---|
| Tall solid privacy fence | Creates more wind load than an open fence | Post section, spacing, footing and bracing |
| Heavy or wide gate | Concentrates hinge and impact loads | Gate-post and footing specification |
| Freezing climate | Ground movement can disturb shallow foundations | Locally required frost-depth treatment |
| Soft, filled or wet soil | May provide poor lateral support | Site-specific foundation approach |
| Rocky ground | Can limit normal hole geometry | Approved anchoring or excavation detail |
| Slope | Changes exposed height and panel stepping | Post lengths, retaining conditions and drainage |
Before digging, confirm the property boundary and use the local underground-utility locating service. A perfectly spaced fence post is still badly positioned if it lands in somebody else’s land or through a buried service.
Corners and Separate Runs Need Their Own Set-Out
A total perimeter length is useful for budgeting, but it can hide awkward geometry. Imagine a 90 ft L-shaped fence made from a 50 ft run and a 40 ft run. Dividing 90 by 8 ft gives one answer for the total number of intervals, but each leg must actually finish at the corner post. Calculate the two legs separately so the corner lands where the corner exists in real life.
What happens with a 50 ft run and a 40 ft run meeting at one corner, using an 8 ft maximum spacing?
Answer: The 50 ft side needs 7 bays and the 40 ft side needs 5 bays. They share the corner post, so the L-shaped open fence uses 13 posts in total.
Explanation: The first side has 8 posts and the second side has 6, but one corner post belongs to both sides: 8 + 6 − 1 = 13. Calculating the 90 ft as one uninterrupted straight line would ignore the fixed corner position.
Whenever a corner, gate or building fixes a post location, solve the runs on each side of that fixed point separately. Let the spacing reduce slightly inside each run rather than allowing the layout to drift past the feature.
Common Fence-Post Estimating Mistakes
Mistake, consequence and better approach
| Mistake | What goes wrong | Better approach |
|---|---|---|
| Dividing length by spacing and rounding down | The final bay exceeds the maximum spacing | Round the number of bays up |
| Forgetting the final post on an open run | The count is short by one post | Use bays + 1 |
| Treating a closed perimeter like a straight run | One post is counted twice | The first post also closes the loop |
| Subtracting gate width and forgetting gate posts | The opening has no structural boundaries in the estimate | Keep each gate as an interval |
| Adding two generic posts for every gate without drawing it | End gates and shared posts can be double-counted | Lay out the actual gate position |
| Using a nominal panel name as the installed module | Posts drift away from panel joints | Use the supplier’s installation dimension |
| Applying one spacing across an L-shaped fence | The corner may fall between calculated posts | Calculate each fixed run separately |
| Choosing post-hole depth from a universal internet rule | Foundation may not suit soil, frost or wind | Verify local and manufacturer requirements |
| Buying concrete from bag weight | Bag count is meaningless | Use mixed yield per bag |
| Ordering the exact calculated quantity with no site review | Damage, cuts and irregular holes can cause a shortage | Use a reasoned allowance where appropriate |
A Practical Fence Ordering Sequence
- Confirm the boundary and proposed fence route.
- Measure every straight run separately.
- Mark corners, ends and gates on a sketch.
- Choose the actual fence product or at least the intended construction type.
- Copy the approved post spacing or panel module from the product information.
- Calculate the bays between fixed points and round up where spacing is a maximum.
- Add gate openings as structural intervals.
- Count posts from the completed interval layout.
- Calculate panels, pickets, rails or mesh using the correct purchasing unit.
- Choose the post-hole diameter and depth required by the real design.
- Calculate concrete from hole volume and exact bag yield.
- Recheck the layout on site before buying or digging.
If you can point to every post on a sketch and explain what sits between it and the next post, the material estimate is usually easy to audit. If the entire plan is one number called “150 ft fence,” the surprises are still hiding.
Frequently Asked Questions
How many fence posts do I need for 100 ft of fence?
For a straight run with no gates and a maximum spacing of 8 ft, 100 ft requires 13 bays and 14 posts. If the selected fence requires closer spacing, contains fixed corners or includes gates, the count changes.
How many fence posts do I need for 30 metres?
At a maximum spacing of 2.4 m, a 30 m straight run requires 13 bays and 14 posts. At a different approved spacing or when fixed gate and corner positions divide the run, calculate those sections separately.
Is 6 ft or 8 ft better for fence-post spacing?
Neither is universally better. Both appear in common timber-fence practice, but the correct maximum spacing depends on fence height, rails, post size, panel construction, wind exposure and the selected product. Use the spacing approved for the actual system.
Should posts be exactly 8 ft apart?
Only when the fence system specifically requires that module and the layout fits it. If 8 ft is a maximum spacing for a site-built fence, it is usually better to divide the run into a whole number of equal bays slightly below 8 ft than to leave one short final bay.
Do gates add two fence posts?
A gate opening normally has a post on each side, but it is safer to think of the gate as an interval in the layout than to blindly add two posts after the rest of the fence has already been counted. A gate at an end, paired gates or a shared post can otherwise be counted twice.
Do I need concrete for every fence post?
Not every fence system uses the same foundation method. Some posts are set in concrete, some use proprietary ground anchors, some metal systems use driven posts, and some installations use other approved details. Follow the selected fence and site requirements rather than assuming one method for every post.
How many bags of concrete does one fence post need?
There is no universal bag count. Calculate the hole volume from diameter and depth, decide whether your method uses gross or net concrete volume, add any justified allowance and divide by the mixed yield printed on the selected bag. Bag weight alone is not enough.
Can I calculate a closed backyard perimeter as one number?
For a simple rectangular loop with no fixed complications, a total perimeter can provide an early count. For the final set-out, calculate each side between corners so every corner post lands at the real corner and each side receives sensible spacing.
Useful Product and Installation References
These references are useful examples of why fence dimensions must be taken from the selected system. They are not universal construction standards and do not replace local requirements.
The Home Depot: fence layout and common picket-post spacing guidanceJacksons Fencing: 1.83 m panel and post-width layout exampleJacksons Fencing: panel, post and gravel-board system exampleFinal Fence Check
- Every straight run has been measured separately.
- Corners, free ends and gates are marked on the layout.
- The spacing comes from the actual fence system or an appropriate design.
- Pre-made panels use the correct installed module rather than a guessed nominal width.
- Gate posts and gate foundations have been checked separately where required.
- The post count follows the real number of intervals.
- Concrete uses the chosen hole dimensions and exact bag yield.
- Boundary, underground services, drainage, soil and local requirements are checked before digging.
- The final material quantities are rounded to the units the supplier actually sells.
The most reliable fence estimate is not the one with the cleverest formula. It is the one that matches the real line on the ground. Measure the route, place the fixed features, divide the remaining runs into workable bays, then count the posts, infill and concrete. Once every interval has a job, the order becomes easier to explain—and much less likely to end with one lonely post, two missing panels and an emergency trip to the supplier.
Open the HomDera Fence CalculatorConcrete Calculator — volume and bags for post holesPlanning masonry instead? See the concrete-block quantity guide