
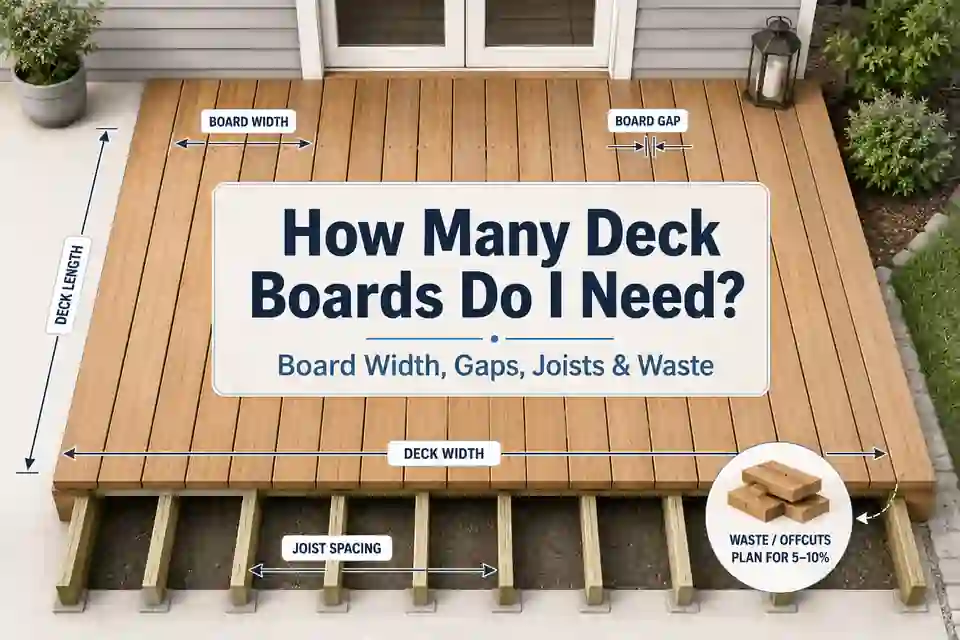
Deck area is only the beginning of a material estimate. Decking is installed in rows, sold in fixed lengths and supported by joists. The final order depends on the direction of the boards, their finished face width, the required gaps, where butt joints land and whether cut pieces can genuinely be reused.
Two decks with the same square footage can therefore need different numbers of boards. One layout may use full-length pieces with almost no end joints. Another may create a narrow final row, many supported joints and several offcuts that are too short for the next row.
Quick answer: calculate the number of board rows, multiply by the length of each row, convert that linear length into complete stock boards using a workable cutting plan, add a realistic allowance and round up.
This guide estimates purchasing quantities; it does not design a load-bearing deck. Joists, beams, posts, footings, ledgers, guards, stairs and connections must follow the structural design, product instructions and local requirements.
Deck-board quantity, from dimensions to a practical order
The Four Numbers in a Decking Estimate
Area is not the same as boards to buy
| Number | What it means | Use |
|---|---|---|
| Deck area | Length × width | Early budgeting and comparisons |
| Board rows | Parallel rows across the deck | Determined by board width and side gap |
| Net linear decking | Rows × row length | Theoretical surface length before stock cuts |
| Complete stock boards | Whole boards in supplier lengths | The number used for purchasing |
For a simple rectangle, these values are closely related, but they are not interchangeable. The purchase quantity must respect complete board lengths and a real layout rather than relying on square footage alone.
Measurements and Product Details You Need
- Finished deck length and width.
- The direction in which the boards will run.
- Actual finished face width of the selected board.
- Required side-to-side gap.
- Stock lengths available from the supplier.
- Required end and perimeter clearances.
- Approved joist spacing for the board profile and direction.
- Any picture frame, breaker board, fascia or fixed opening.
- A minimum offcut length that can genuinely be reused.
- A cutting and damage allowance.
Use actual board width, not a nominal name
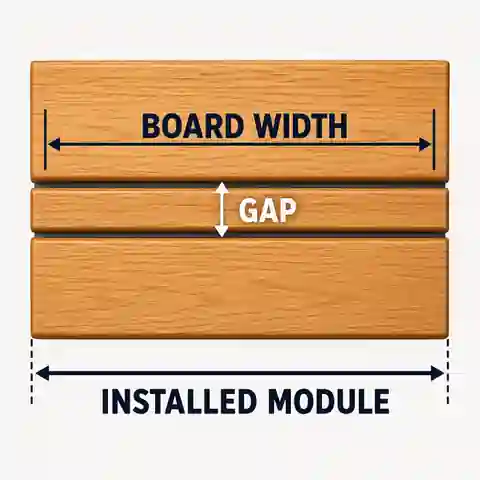
The useful width is the finished face width of one installed board.
Add the approved side gap to create the repeated installed module.
Check the exact profile because grooved, square-edge, scalloped and solid boards may have different dimensions and support rules.
Copy board width, stock length, profile and installation requirements from the exact product documentation. A familiar product name is not a dimension.
How to Calculate the Number of Board Rows
Rows are counted across the dimension perpendicular to the boards. If boards run along the 20 ft length of a 20 × 12 ft deck, each row is about 20 ft long and the rows are counted across the 12 ft width.
Board rows = round up [(net field width + one side gap) ÷ (actual board width + side gap)]. Use the width available to the straight field boards after subtracting picture-frame borders, fixed drainage strips and other non-boarded edge details.
The extra gap in the numerator is included because a group of boards has one fewer gap than boards. For example, 26 boards create 25 side-to-side gaps. The formula assumes there is no additional side gap outside the first and last field board. Any perimeter clearance, picture-frame border or fixed opening must be removed from the field width before calculating the rows.
The board width plus one side gap forms the installed module. A 5.5 in board with a 1/4 in gap repeats at 5.75 in. A 140 mm board with a 5 mm gap repeats at 145 mm.
How many rows cover a 12 ft width using 5.5 in boards with 1/4 in gaps?
Answer: Twenty-six rows are required, but the edge layout must be checked because the remaining final strip is extremely narrow.
Explanation: Twelve feet is 144 in. (144 + 0.25) ÷ 5.75 = 25.09, rounded up to 26 rows. Starting with full boards leaves only about 1/4 in for the last row, so the first and last rows should be balanced or the border layout changed.
How many rows cover 4 m using 140 mm boards with 5 mm gaps?
Answer: Twenty-eight rows, with an estimated final-row width of about 85 mm.
Explanation: (4,000 + 5) ÷ 145 = 27.62, rounded up to 28. The remaining width is 4,000 − 27 × 145 = 85 mm.
A positive final-row width is not automatically practical. A narrow rip may look poor, flex or leave too little fastening room. Balance the first and last rows before cutting.
Board Gaps Affect Quantity and Performance
There is no universal gap for every timber, composite or PVC board. Side gaps assist drainage and allow expected movement. End gaps and clearances beside walls, posts or borders may follow different rules. Use the current installation guide for the exact product and installation temperature.
Different gaps have different jobs
| Gap | Location | Effect on the estimate |
|---|---|---|
| Side gap | Between parallel board edges | Changes the row count |
| End gap | Between two board ends | Affects butt joints and row length |
| Perimeter clearance | Beside a wall, post or border | Reduces the usable field width or length |
| Planned drainage opening | Channel, grate or hatch | Must be removed or modelled separately |
Board direction and joists must be planned together
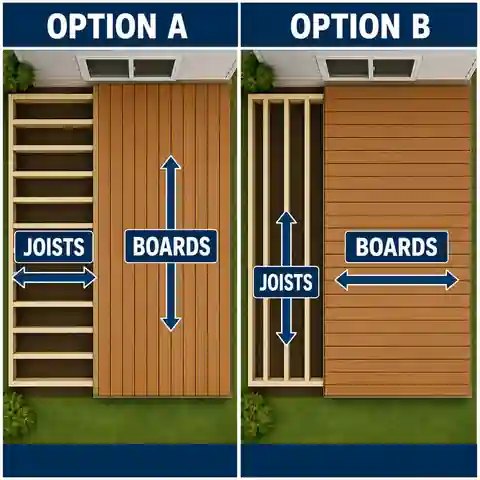
Straight boards are normally supported by joists running perpendicular to them.
Changing board direction changes row length, row count, joist direction and butt-joint positions.
Diagonal boards often require closer joist spacing under the product instructions.
Never change the required gap simply to remove one row. If the layout is awkward, change the starting position, border detail or board direction within the approved system.
Convert Rows into Complete Stock Boards
Multiply the number of rows by the row length to obtain net linear decking. Then compare that length with the stock boards actually sold. The final count must also reflect where cuts and supported end joints occur.
Net linear decking = board rows × row length. Preliminary stock-board count = net linear decking ÷ stock length, followed by a row-by-row cutting check.
Why a cutting plan matters
| Method | Useful for | Main limitation |
|---|---|---|
| Area ÷ board coverage | Early estimate | Ignores stock lengths and joints |
| Linear length ÷ stock length | Minimum material length | Assumes cuts can be arranged efficiently |
| Each row separately | Conservative check | May ignore reusable offcuts |
| Row-by-row cutting plan | Final purchasing plan | Must still follow support and fastening rules |
Planned Reuse and Conservative Mode Give Different Results
The HomDera calculator offers two ways to convert row lengths into complete stock boards. Planned-reuse mode carries a sufficiently long remainder into a later row. Conservative mode starts every row separately and does not assume that an offcut from one row will be useful in another. The difference can be large when the stock board is only slightly shorter than the required row.
How the two cutting modes work
| Mode | How boards are counted | When it is useful | Main limitation |
|---|---|---|---|
| Planned reuse | A remaining piece can continue into another row when it is at least as long as the entered minimum reusable offcut | Straight rectangular decks with a measured cutting plan and supported staggered joints | The automatic sequence still needs to be checked against real joint positions, board direction and fastening rules |
| Conservative — separate rows | Every row begins with new stock boards and remainders are not used to reduce another row | Early budgeting, uncertain layouts or projects where offcut reuse cannot yet be confirmed | It can substantially overstate the purchase when many suitable offcuts will actually be reused |
The minimum reusable offcut is a planning input, not a universal safe-piece length. A piece must also be long enough to reach the required supports, accept fasteners at the permitted edge distances and fit the intended joint pattern.
How many 16 ft boards are needed for a 20 × 12 ft deck with a 24 in minimum reusable offcut and a 10% allowance?
Answer: Planned-reuse mode gives a base estimate of 33 stock boards and a purchase quantity of 37 after the allowance. Conservative separate-row mode gives 52 base boards and 58 boards after the same allowance.
Explanation: The deck requires 26 rows that are 20 ft long, giving 520 linear ft of net decking. The mathematical minimum is 520 ÷ 16 = 32.5, rounded up to 33 stock boards. In planned-reuse mode, continuation pieces such as 4 ft sections are longer than the entered 24 in minimum and can be assigned to later rows. Conservative mode assumes that each 20 ft row opens two separate 16 ft boards, so 26 × 2 = 52 base boards. Before ordering from the lower result, draw the staggered joint pattern and confirm that every reused piece lands on approved support.
Worked imperial estimate in both cutting modes
| Step | Calculation | Result |
|---|---|---|
| Deck area | 20 × 12 ft | 240 ft² |
| Installed module | 5.5 in board + 0.25 in gap | 5.75 in |
| Board rows | (144 + 0.25) ÷ 5.75 | 25.09 → 26 rows |
| Net decking | 26 × 20 ft | 520 linear ft |
| Planned-reuse base | Efficient compatible reuse of suitable offcuts | 33 stock boards |
| Planned reuse with 10% | 33 × 1.10 | 36.3 → 37 boards |
| Conservative base | 26 rows × 2 stock boards per row | 52 stock boards |
| Conservative mode with 10% | 52 × 1.10 | 57.2 → 58 boards |
An offcut is useful only when it has a next location
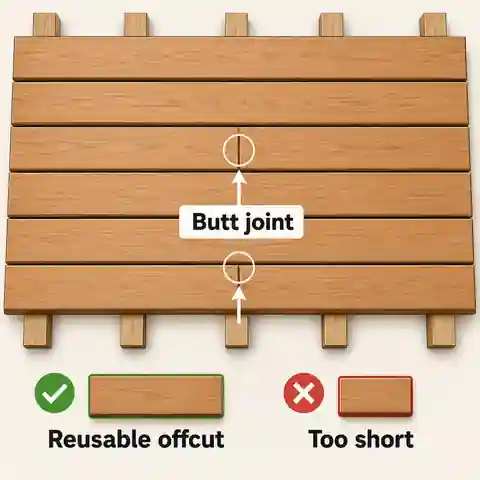
Mark every cut piece and its remaining length.
Place each butt joint on the support required by the decking system.
Do not count an offcut as reusable when it is too short, damaged or unable to meet fastening distances.
Board Direction Can Change the Purchase
Direction changes the number and length of rows, the joist direction and the number of butt joints. Compare both main directions before finalising the frame, but do not choose only by the smallest board count.
Compare both directions
| Question | Why it matters |
|---|---|
| Can one stock board span a full row? | Full-length rows may eliminate butt joints |
| Where will the joists run? | Boards usually need perpendicular support |
| How will water and debris leave? | Direction must work with the drainage plan |
| Can the boards reach the site? | A long board is useless if it cannot reach the deck |
| How will the field look from the entrance? | Direction changes the visual proportions |
Does changing direction matter on the 20 × 12 ft example?
Answer: Yes. In an illustrative cutting comparison, boards along the 20 ft direction require about 37 boards after allowance, while boards along the 12 ft direction require about 36.
Explanation: The area is identical, but 12 ft pieces combine differently with 16 ft stock. The structural frame, drainage and appearance still determine whether the second direction is suitable.
The HomDera calculator's Automatic mode compares both straight board directions and first selects the one requiring fewer complete decking boards. If the board quantities are equal, it compares estimated butt joints, framing stock pieces and then the number of rows. This is a material-efficiency comparison, not approval of the structural layout, drainage direction or finished appearance.
Joists, Butt Joints and Fasteners
Board quantity and framing quantity are connected but different. Board width and gaps determine rows. Approved on-centre spacing determines support lines. The permitted spacing depends on the exact board profile, board angle, loading and installation guide.
Three checks that cannot be guessed
| Detail | Why it changes quantity | What to use |
|---|---|---|
| Joist spacing | Changes the number of support lines and fasteners | Product guide and structural design |
| Butt-joint support | May require double joists, blocking or special clips | Approved joint detail |
| Fastening system | Face screws and hidden clips are counted differently | Exact board and fastener instructions |
Do not choose 12 in, 16 in, 400 mm or 450 mm spacing simply because it is familiar. Maximum spacing belongs to the exact conditions stated beside it.
For a preliminary face-screw estimate, count board-to-joist intersections, add joint connections, multiply by the required screws per connection and then add a small fastener allowance. Hidden systems may also need starter clips, locking pieces and special joint hardware.
How many support lines are estimated under 20 ft board runs at 16 in on centre?
Answer: Sixteen support lines in the calculator's preliminary rectangular model.
Explanation: Twenty feet is 240 in. Dividing by 16 gives 15 spaces, so 16 support lines bound those spaces. This does not select joist size or include beams, posts, ledgers, blocking or doubled supports at joints.
Preliminary fastener counting
| System | Starting quantity | Remember to add |
|---|---|---|
| Face screws | Board rows × support lines × screws per connection | Butt-joint connections and allowance |
| Hidden clips | Board-to-joist clip locations | Starter, locking and joint clips |
| Square-edge perimeter boards | System-specific screws or plugs | Corners, borders and breaker boards |
In the 20 × 12 ft example, 26 rows over 16 support lines create 416 ordinary row-to-support intersections before butt joints. Adding about 26 joint connections gives 442 connection points. At two face screws per connection and a 10% allowance, the preliminary quantity is about 973 screws, or 10 packs when each pack contains 100.
Fastener coverage printed on a package is a useful cross-check, not a complete layout. Borders, starters, butt joints, damaged clips and system-specific pieces can change the number of packs.
How Much Waste Should You Add?
Waste covers cuts, damaged ends, rejected boards, colour selection, unusable pieces and complete-board rounding. Apply it after the main row and cutting pattern is understood.
Illustrative planning allowances
| Layout | Possible starting allowance | Reason |
|---|---|---|
| Simple rectangle with favourable stock lengths | About 5% | Few unusual cuts |
| Typical rectangular deck with butt joints | About 8–10% | Ordinary cuts, damage and rounding |
| Picture frame, obstacles or several directions | About 10–15% | More unique pieces and limited offcut reuse |
| Diagonal, herringbone or special-order material | Detailed layout | A single percentage may be misleading |
A 10% allowance is not a substitute for a cutting plan. A damaged 16 ft board cannot always be replaced by several mathematically equivalent short offcuts.
Fascia, Borders and Breaker Boards
A field-board calculation does not automatically include fascia, picture-frame borders, breaker boards, stair trim or screening. These pieces may use another profile, colour, width or stock length, and they can reduce the dimensions available to the main field.
Calculate these components separately
| Component | Quantity basis | Important effect |
|---|---|---|
| Fascia | Exposed perimeter ÷ fascia length | Usually not part of the walking surface |
| Picture frame | Border path and corner cuts | Reduces the field-board area |
| Breaker board | Designed transition length | Splits long runs and needs support |
| Stair boards | Number and size of treads or risers | Uses stair-specific support rules |
Complete Metric Example: 6 m × 4 m Deck
Example inputs
| Input | Value |
|---|---|
| Deck size | 6 m × 4 m |
| Board direction | Along the 6 m length |
| Finished board width | 140 mm |
| Side gap | 5 mm |
| Stock length | 4.8 m |
| Joist spacing | 400 mm on centre, subject to approval |
| Deck-board allowance | 10% |
- Installed module: 140 + 5 = 145 mm.
- Rows: (4,000 + 5) ÷ 145 = 27.62, rounded up to 28.
- Estimated final-row width: 4,000 − 27 × 145 = 85 mm.
- Net decking: 28 × 6 m = 168 linear metres.
- A compatible sequential cutting plan opens about 35 boards at 4.8 m.
- With 10% allowance: 35 × 1.10 = 38.5, rounded up to 39 boards.
- At 400 mm on centre along the 6 m board run, the preliminary model contains 16 support lines.
This example is a preliminary rectangular estimate. It does not select joist size or include beams, posts, footings, ledgers, blocking, doubled supports, stairs or guards.
Choose Stock Lengths Before You Finalise the Layout
Longer stock boards can reduce butt joints, but they are not automatically the cheapest or easiest option. Compare the row length with every stock length actually available. A shorter board may create more joints but produce useful repeated cuts, while a longer board may leave a large remainder that has nowhere to go.
Stock-length questions to answer
| Question | Why it matters |
|---|---|
| Can one board span the full row? | May eliminate butt joints and joint hardware |
| Can the remainder start another row? | Determines whether an offcut is genuinely reusable |
| Can the board reach the deck? | Long pieces may not turn through gates, buildings or trees |
| Can it be stored flat and supported? | Poor storage can bend, stain or damage boards |
| Are all lengths available in the same colour and batch? | Mixing stock may create visible variation |
When You Need a Scaled Layout
- L-shaped, curved, polygonal or multi-level decks.
- Diagonal, herringbone or multiple-direction patterns.
- Picture frames, breaker boards or contrasting borders.
- Columns, trees, hot tubs, access hatches or drainage channels.
- Different board profiles, colours or stock lengths.
- Long runs with many deliberately staggered joints.
Divide a complex deck into named zones. Draw borders and fixed openings first, then place field boards, joints and support lines. Keep different products in separate totals and use the scaled cutting plan for the final purchase.
Common Deck-Board Estimating Mistakes
Mistake and correction
| Mistake | Better approach |
|---|---|
| Stopping at deck area ÷ board area | Calculate rows, linear length and stock-board cuts |
| Using nominal board width | Use the actual finished face width |
| Ignoring gaps | Include the approved installed gap |
| Assuming every offcut is reusable | Assign each reused piece to a real location |
| Placing joints wherever boards end | Design approved support beneath every joint |
| Choosing joist spacing from habit | Use the product guide and structural design |
| Adding one universal 10% | Choose allowance from the actual layout |
| Forgetting fascia and borders | Calculate every named component separately |
| Ignoring access and storage | Confirm the delivery route and level storage area |
Frequently Asked Questions
How many deck boards do I need per square foot?
There is no universal value because board width, gap and stock length vary. Square footage can produce an approximate linear quantity, but the final order still needs rows, cuts and complete-board rounding.
How do I calculate linear feet of decking?
Multiply the number of board rows by the length of each row. For example, 26 rows that are 20 ft long require 520 linear ft of net decking. This is not yet the number of stock boards to buy because complete board lengths, cutting waste, butt joints and reusable offcuts must still be considered.
How many 16 ft boards do I need for a 20 × 12 ft deck?
In the worked example with 5.5 in boards, 1/4 in gaps, boards running along the 20 ft direction and 10% allowance, the estimate is 37 complete 16 ft boards.
How many boards do I need for a 12 × 12 ft deck?
With 5.5 in boards and 1/4 in gaps, the deck needs 26 rows. If 12 ft boards span every row, the base count is 26 boards; adding 10% produces a preliminary order of 29.
Does the gap reduce the board count?
It can, because gaps occupy part of the deck width. The gap must still come from the exact product instructions and must not be enlarged merely to save one row.
Is 10% waste always enough?
No. A simple full-length layout may need less, while diagonal, bordered or heavily interrupted layouts may need more. Build the main cutting plan first.
Can I reuse offcuts in the next row?
Yes, when the piece is long enough, undamaged and able to start or end on an approved support. Mark its next location before subtracting it from the purchase.
Why does conservative mode show so many more boards?
Conservative mode treats every row as a separate order and does not use the remainder from one row to reduce the next. For a 20 ft row made from 16 ft stock, it counts two stock boards for that row even though a 12 ft remainder may be useful elsewhere. The result is intentionally cautious and is most useful when no reliable cutting and joint plan has been prepared.
Do timber and composite decking use the same calculation?
The geometry is similar, but the inputs are not interchangeable. Finished width, gaps, stock lengths, movement, joist spacing and fastening rules must come from the exact material and product.
Do I include a picture frame in the field-board count?
No. Calculate the border separately, then subtract its width and clearances from the dimensions available to the field boards.
Should I subtract posts, a hot tub or an access hatch?
Subtract only the area that will definitely not receive decking, then draw the surrounding cuts. A small post may remove little surface area while creating several extra cuts, so subtracting its footprint does not necessarily reduce the number of complete boards.
Are stair boards included in the deck-surface estimate?
No. Treads, risers, landings and stair trim should be calculated separately. Stair boards may use different lengths, overhangs, support spacing and fastening rules from the main deck field.
Can square footage be used for a price estimate?
Yes, for an early comparison when a supplier quotes a price per square foot or square metre. For purchasing, multiply the final number of complete boards by the price per board and add fascia, framing, fasteners, delivery, tax and allowance separately.
Technical References for Product-Specific Checks
Use the current installation documentation for the exact decking product purchased. The official resources below illustrate why board gaps, joist spacing, diagonal layouts, fastening and edge clearances vary by material, profile, loading and market. A general article or calculator must not override the selected product's latest instructions.
Trex installation guides and current composite-decking instructionsTimberTech deck joist spacing, blocking and board-direction guidanceTDCA timber-decking specification and board-spacing guidance for the United KingdomWoodSolutions Domestic Timber Deck Design guidance for AustraliaFinal Quantity Check
- The finished deck dimensions were measured on site.
- The net field dimensions exclude picture-frame borders, drainage strips and areas that will not receive field boards.
- The selected board direction agrees with the approved framing, drainage and access plan.
- Finished board width and stock length match the exact selected product.
- Side, end and perimeter gaps come from the current product instructions.
- The selected cutting mode reflects whether offcuts will genuinely be reused between rows.
- The minimum reusable offcut is realistic for the support spacing, fastening distances and planned joint pattern.
- The first and final rows are wide enough to install and fasten properly.
- Every butt joint has a named and approved support detail.
- The allowance reflects the real cutting pattern rather than being added automatically.
- Joist spacing has been checked for the board profile, direction and project loading.
- Face screws or hidden-fastener components are counted as a complete system.
- Fascia, picture frames, breaker boards, screening and stairs are separate quantities.
- Delivery access, flat storage, colour or batch consistency and return conditions are confirmed.
A dependable estimate follows a simple sequence: measure the deck, choose board direction, calculate rows from actual board width and gaps, convert those rows into a supported cutting plan, add a controlled allowance and round to complete stock boards.
Open the HomDera Decking CalculatorExplore HomDera construction and outdoor calculatorsHow HomDera handles assumptions, rounding and calculator limitations