
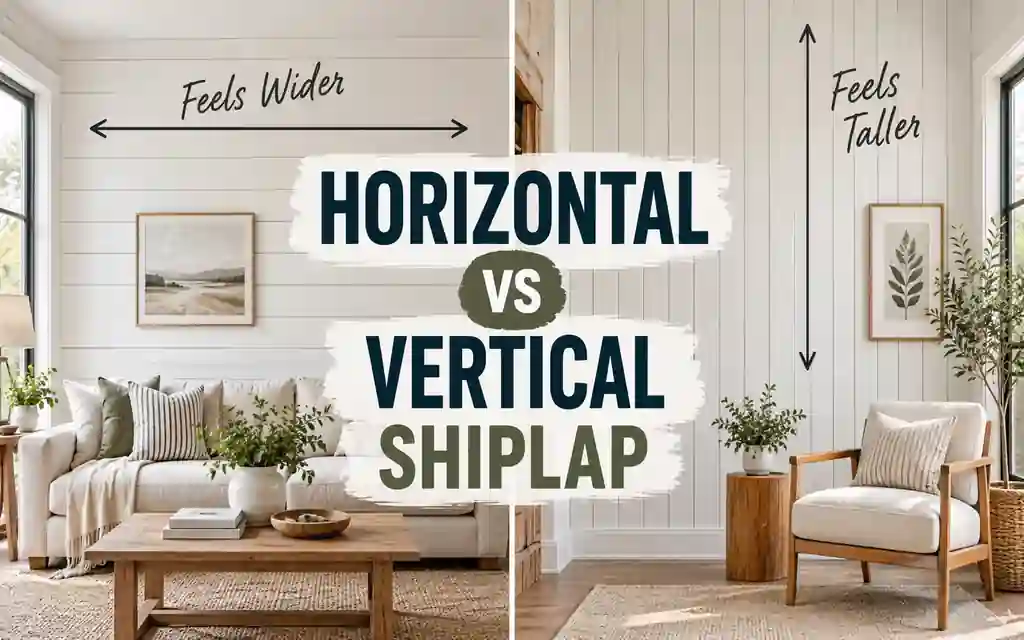
Horizontal and vertical shiplap use the same basic idea—repeated boards with a visible joint or reveal—but they make the eye travel in different directions. Horizontal lines encourage you to read a wall from side to side. Vertical lines pull your attention from floor to ceiling. That simple change can alter how wide, tall, calm or busy a room feels even though the room itself has not changed by a millimetre.
The practical question is therefore not “Which direction is correct?” Both can work. The useful question is “What does this particular room need?” A narrow hallway may benefit from a stronger sense of width, while a low bedroom may feel better when the wall finish draws the eye upward. Furniture, windows, doors, wall length, ceiling height, board width and even paint colour can change the answer.
Quick answer: horizontal shiplap can make a wall feel longer and a narrow room feel wider. Vertical shiplap can make the eye travel upward and make a low ceiling feel taller. Neither physically enlarges the room, and the effect becomes weaker when furniture, strong architectural lines or very dark finishes dominate the space.
Shiplap is especially common terminology in North America. In the UK, Ireland, Australia and other markets, you may also encounter terms such as timber wall cladding, interior panelling or paneling, tongue-and-groove boards and nickel-gap boards. The profiles are not identical, so always follow the installation instructions for the exact product you buy.
Choose the direction by the room, not by habit
Horizontal vs Vertical Shiplap at a Glance
The practical difference between horizontal and vertical shiplap
| Question | Horizontal shiplap | Vertical shiplap |
|---|---|---|
| Main visual effect | Emphasises the width and length of the wall | Emphasises floor-to-ceiling height |
| Often suits | Narrow rooms, long feature walls, relaxed traditional or coastal interiors | Low ceilings, compact rooms, modern feature walls and full-height treatments |
| Eye movement | Side to side | Up and down |
| Typical installation advantage | Boards can often fasten directly across wall studs when the product allows it | May need horizontal strapping, furring or a suitable backer so every board has reliable fixing points |
| Seam planning | Long walls may need staggered butt joints when stock boards are shorter than the wall | Standard boards can often run full height when the ceiling is within the available stock length |
| What can weaken the effect | Very wide boards, strong vertical windows, tall furniture or a short feature section | Strong horizontal furniture lines, half-height installation or a very wide low room |
| Best deciding test | Mock up several horizontal lines and view from the doorway | Mock up several vertical lines and view from the doorway |
Does Shiplap Really Make a Room Look Bigger?
It can change perceived proportions, but “bigger” needs to be defined. Horizontal shiplap does not add floor area; it can make the wall read as broader because the repeated joints create long horizontal paths. Vertical shiplap does not raise the ceiling; it creates repeated vertical lines that lead the eye upward. Think of the boards as visual arrows. They tell the eye where to travel first.
The direction of the joints changes what the eye notices first
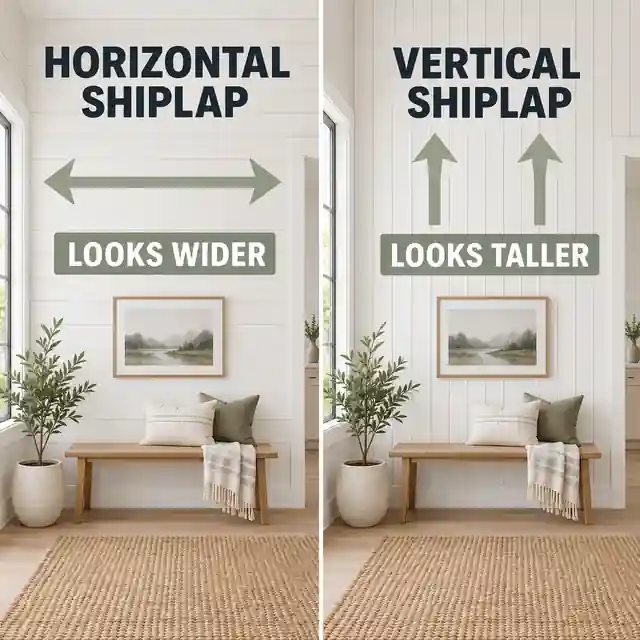
Horizontal joints create repeated side-to-side lines, so the wall can feel longer or the room broader.
Vertical joints create repeated floor-to-ceiling lines, so the wall can feel taller.
The effect is strongest on a clear wall where the board rhythm is easy to read.
Windows, tall cabinets, artwork, shelving and contrasting trim can introduce stronger lines that compete with the shiplap.
When Horizontal Shiplap Works Best
Horizontal shiplap is the familiar arrangement for a reason: it creates calm, continuous bands and can visually stretch a wall from one corner to the other. In a narrow room, that sideways movement can reduce the feeling that the walls are closing in. It also works naturally behind furniture that already has a strong horizontal shape, such as a sofa, bed, media console or long dining bench.
- A narrow living room where you want the main wall to feel longer
- A corridor or entry where the side walls should feel less tall and tunnel-like
- A bedroom with a wide bed and headboard that already create a horizontal composition
- A fireplace or media wall where horizontal boards can reinforce the width of the feature
- A long uninterrupted wall where continuous courses can create a calm visual rhythm
- Traditional, coastal, cottage, farmhouse or transitional interiors where the classic direction suits the rest of the detailing
Horizontal does not automatically mean “wider” in every room. If the boards stop on a short feature wall between two strong vertical corners, or if tall windows dominate the view, the width effect can be much less noticeable. Judge the whole wall from the normal viewing position.
When Vertical Shiplap Works Best
Vertical shiplap feels more contemporary to many people because it breaks from the traditional horizontal treatment, but its most useful design feature is the upward rhythm. The joints run from floor toward ceiling, so a low or compact room can feel less compressed. It is especially effective when the boards run the full visible height without being interrupted by a heavy horizontal rail halfway up the wall.
- Rooms with low or visually heavy ceilings
- Small bedrooms, powder rooms, home offices or entries where extra visual height is welcome
- Feature walls where a clean full-height pattern suits a modern or minimalist interior
- Walls between tall windows or doors where the vertical rhythm can echo the architecture
- Spaces where full-height boards can minimise horizontal butt joints
- Half-wall treatments only when the goal is texture rather than making the full room feel taller
Low Ceiling? Vertical Shiplap Usually Has the Stronger Advantage
If your main problem is a ceiling that feels low, vertical shiplap is normally the first direction worth testing. The vertical joints create repeated paths from skirting board or baseboard to ceiling. Keep the top transition simple, because a thick contrasting crown moulding or moulding band can visually cut the wall short and reduce the effect you were trying to create.
A low room benefits when the eye can travel uninterrupted from floor to ceiling
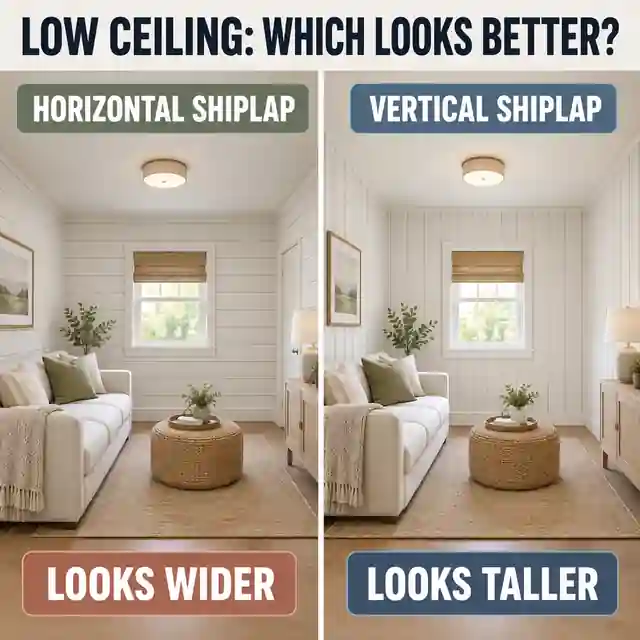
Full-height vertical boards create a continuous upward rhythm.
A heavy contrasting picture rail, shelf or half-height break can interrupt that rhythm.
Keeping wall and trim colours related can make the wall read as one taller surface.
Tall curtains and vertically oriented artwork can reinforce the same direction, but too many vertical details can also make the room feel busy.
Narrow Room? Horizontal Shiplap Can Make the Walls Feel Broader
In a narrow room, horizontal boards can help the side walls feel longer and less compressed. This works particularly well when the board courses run continuously across the longest visible wall. The effect is less useful if the room is already very wide and low; in that case, adding more horizontal emphasis may exaggerate the squat proportion instead of improving it.
What About a Very Small Room?
Choosing shiplap direction in a small space
| Small-room problem | Direction to test first | Why |
|---|---|---|
| Low ceiling | Vertical | Makes the eye travel upward and can reduce the compressed feeling |
| Narrow width | Horizontal | Encourages the wall to read side to side |
| Tiny square room | Either | Proportion, colour and line density matter more than the label horizontal or vertical |
| Very busy room | Whichever creates fewer competing lines | A calmer wall often feels larger than a wall with too many joints and objects |
| One clear feature wall | Choose by the feature itself | A wide headboard may suit horizontal boards; a tall fireplace may suit vertical boards |
| Small room with many doors | Mock up both | Short broken wall sections can weaken either optical effect |
One Accent Wall or the Whole Room?
Direction has a stronger visual effect when the pattern is easy to read. One well-chosen accent wall can therefore change the character of a room without covering every surface. Wrapping all four walls creates a much stronger rhythm and can feel cosy and architectural, but in a small room it can also become visually dense if the boards are narrow, the reveal is dark or the décor adds many more lines.
- Use one accent wall when you want the shiplap to frame a bed, fireplace, dining area or media zone.
- Wrap several walls when the finish is intended to become part of the room's architecture rather than a decorative feature.
- Keep the same board direction through connected walls unless a clear architectural break justifies a change.
- Avoid changing from horizontal to vertical at an arbitrary inside corner; the transition should look designed, not accidental.
- Use painter's tape to sketch several joints before buying material. A five-minute mock-up reveals line density surprisingly well.
Best Shiplap Direction by Room
Room-by-room starting points
| Room or feature | Direction worth testing first | What should decide the final choice |
|---|---|---|
| Living room | Horizontal for width; vertical for a tall feature wall | Sofa, fireplace, windows, media unit and ceiling proportion |
| Bedroom | Horizontal behind a wide bed; vertical for a low ceiling | Headboard width, bedside furniture, wall height and window position |
| Hallway / entry | Horizontal on narrow side walls; vertical in a low compact entry | Door casing, corridor length, ceiling height and sight line from adjoining rooms |
| Kitchen | Either | Cabinet lines, backsplash height, range hood, shelves and cleanability |
| Bathroom / powder room | Often vertical for height | Moisture suitability, vanity height, mirror, waterproof zones and ventilation |
| Home office | Either | Desk width, shelving, video-call background and how visually busy the room already is |
| Fireplace wall | Follow the main proportion of the feature | Fireplace dimensions, mantel, television, combustible-clearance requirements and surrounding trim |
Living room: follow the strongest piece of architecture
A living room usually contains several large horizontal objects, especially sofas, media units and mantels. Horizontal shiplap can connect those elements into a wider composition. Vertical shiplap works well when the feature itself is tall—for example, a floor-to-ceiling fireplace chase—or when the ceiling needs more visual lift. Stand at the main doorway before deciding; that is often where the proportion is easiest to judge.
Bedroom: the headboard is part of the geometry
Behind a bed, horizontal boards naturally echo the width of the mattress and headboard, which can make the sleeping zone feel grounded and calm. Vertical boards create a taller backdrop and can make a modest headboard feel more architectural. If the wall is very wide but the bed is narrow, vertical shiplap can also stop the feature wall from feeling like one enormous horizontal stripe.
Hallway and entry: decide whether width or height is the real problem
A long, narrow hallway can feel like a tunnel. Horizontal boards on the long wall may visually widen it, but too many high-contrast joints can also emphasise the corridor's length. In a small entry with a low ceiling, vertical boards may be more useful. Check the direction from the adjoining room so the transition does not produce two competing wall rhythms at the doorway.
Kitchen and bathroom: design comes after product suitability
In kitchens and bathrooms, orientation is only one decision. The selected material, coating, substrate, joints and installation method must suit the actual exposure. A decorative shiplap wall near a basin is not automatically suitable inside a shower, and ordinary interior timber or MDF products may have restrictions in wet or humid locations. Use the product documentation before treating a design image as an installation detail.
Do not use decorative shiplap as a substitute for required waterproofing, fire protection, clearances or other building assemblies. Around showers, baths, cooktops, fireplaces and other special zones, follow the relevant product, appliance and local requirements.
Orientation Can Change the Installation, Not Just the Look
This is the practical detail people often discover after choosing the prettier inspiration image. On a typical framed wall, vertical studs provide regular fixing lines. Horizontal shiplap crosses those studs, so many products can be fastened directly into framing. Vertical shiplap runs in the same direction as the studs, which may leave some board edges without suitable fixing points. Manufacturers commonly solve that with horizontal furring or strapping, or with an approved backer.
Installation questions to answer before choosing the direction
| Check | Horizontal boards | Vertical boards |
|---|---|---|
| Where are the framing members? | Board normally crosses multiple vertical studs | Board may run parallel to studs |
| Do you need added backing? | Often less additional backing, depending on product and wall | Frequently needs horizontal furring, strapping or another approved fixing surface |
| Starter reference | Must begin level | Must begin plumb |
| Long dimension | Wall width controls course length and butt-joint planning | Wall height controls board length and top/bottom cuts |
| Uneven wall or ceiling | Final course may need ripping to width | Individual board lengths may vary if floor or ceiling is out of level |
| Fasteners and adhesive | Product-specific | Product-specific; do not assume the horizontal method transfers unchanged |
Why vertical shiplap may need horizontal backing
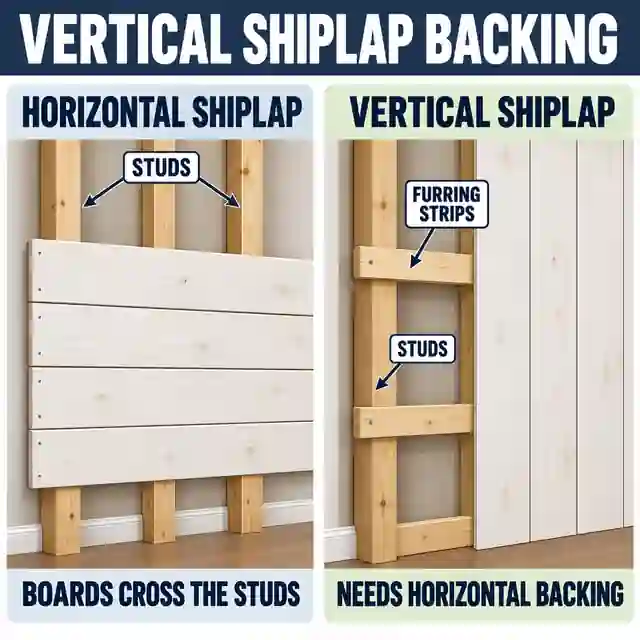
Horizontal boards naturally cross typical vertical wall studs, giving repeated fixing opportunities.
Vertical boards can run parallel to the framing, so the product may require horizontal furring or another continuous fixing surface.
The spacing, fastener type, adhesive and penetration depth are product-specific.
Do not add backing purely from a generic diagram; use the installation instructions for the exact board system.
UFP-Edge and Metrie both publish interior shiplap instructions that treat vertical installation differently from horizontal installation and call for additional horizontal support in their systems. That is a useful reminder that direction is a construction decision as well as a design decision.
Measure the Wall Before You Fall in Love With a Direction
The visual choice and the material calculation are connected. Horizontal installation divides the wall height into courses based on the exposed face or reveal of the board, while the wall width controls the length of each course. Vertical installation turns that geometry ninety degrees: wall width controls the number of vertical strips, and wall height controls the length of each strip. Stock-board length can make one orientation noticeably easier or more wasteful than the other.
Compare horizontal and vertical shiplap quantities, rows, linear feet and stock boardsBoard Width and Reveal Can Matter as Much as Direction
Two vertical shiplap walls can feel completely different if one has narrow boards with frequent dark joints and the other has wider boards with a subtle reveal. The same is true horizontally. More visible joints create a stronger directional pattern. Fewer joints produce a calmer surface where colour, furniture and architecture carry more of the visual weight.
How line density changes the effect
| Board / reveal choice | Visual result | Useful when |
|---|---|---|
| Narrow boards with frequent reveals | Strong rhythm and more visible direction | You want texture and the wall is otherwise simple |
| Medium-width boards | Balanced pattern | Most general accent-wall projects |
| Wide boards with subtle reveals | Calmer, larger-scale surface | The room already has many details or you want a cleaner modern look |
| Dark reveal against light boards | High-contrast grid | You intentionally want the direction to be obvious |
| Low-contrast painted reveal | Softer wall texture | You want shiplap character without turning every joint into a stripe |
Direction is only half the pattern—the number of visible lines matters too
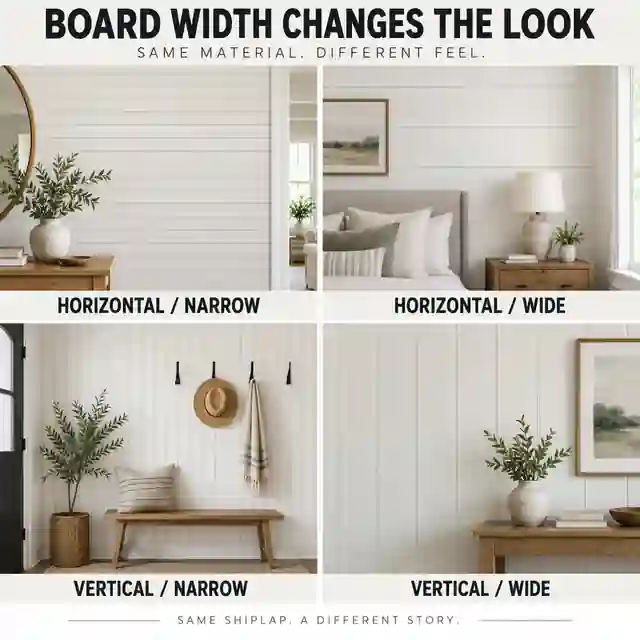
Narrow exposed faces create more joints across the same wall.
More joints make horizontal or vertical direction more visually assertive.
Wider exposed faces reduce line density and can make the finish feel calmer.
Use the exposed face or reveal width from the actual product, not only its nominal board size, when planning the layout.
Doors, Windows, Corners and Trim Can Decide the Direction for You
A blank rectangle is easy. Real walls have casing or architraves, skirting boards or baseboards, sockets, switches, windows, shelves and corners. Horizontal boards create repeated intersections with vertical door and window trim. Vertical boards create repeated intersections with horizontal base and ceiling lines. Neither is a problem, but one may produce far cleaner cuts on your particular wall.
- Decide whether existing baseboard or skirting stays, is removed, or is replaced with a deeper profile.
- Check whether board thickness will project beyond door and window casing.
- Plan the last horizontal course or final vertical strip before fastening the first board.
- Avoid an extremely narrow ripped strip at the ceiling, floor or end corner when a small starting adjustment can balance both edges.
- Measure ceiling-to-floor height in several places before assuming every vertical board can be cut to the same length.
- For horizontal runs longer than available stock boards, decide where butt joints can land and how they will be staggered.
- Locate sockets, switches and hidden services before cutting or fastening.
Colour Can Strengthen or Soften the Shiplap Direction
Orientation is easier to notice when the joints have strong contrast. White boards with dark gaps create a graphic pattern; a single painted colour across faces and reveals is quieter. Dark shiplap can feel rich and dramatic, but in a small room it may visually advance the wall if the lighting is limited. If your main goal is “make this room feel bigger,” direction, colour, light and clutter should be planned together rather than as separate tricks.
Painting the shiplap and the rest of the room? See how to estimate wall paint, coats and coverageShiplap Is Not the Only Way to Change Wall Proportions
If you like the idea of directional wall lines but not the continuous-board look, compare shiplap with board and batten, picture-frame moulding or wainscoting. Board and batten creates stronger individual verticals with wider clear wall areas between them. Wainscoting introduces a major horizontal line at its top. Picture-frame moulding creates repeated rectangles rather than one dominant direction. The best finish is the one that solves the room you actually have.
Prefer a more open vertical rhythm? See how to calculate even board-and-batten spacingFrequently Asked Questions
Does horizontal shiplap make a room look wider?
It can. Repeated horizontal joints lead the eye across the wall, which can make a narrow space feel broader or a feature wall feel longer. The effect is visual rather than physical and depends on the wall being clear enough for the horizontal rhythm to be read.
Does vertical shiplap make a room look taller?
Often, yes. Vertical joints create repeated lines from floor toward ceiling, which can make a low room feel taller. Full-height installation usually strengthens the effect more than a half-height treatment because the vertical line is not interrupted.
Can you mix horizontal and vertical shiplap in the same house?
Yes. Different rooms can use different directions when each choice responds to its own proportions. Within one open-plan view, use more restraint. A change of direction looks intentional when it happens at a clear architectural boundary such as a separate room, fireplace volume or distinct wall panel, not simply because the installer reached a corner.
Final Decision Checklist: Horizontal or Vertical?
- If the room feels too narrow, mock up horizontal lines first.
- If the ceiling feels too low, mock up vertical lines first.
- Judge the wall from the doorway and normal seating positions, not only from 2 ft away.
- Check whether furniture creates a stronger horizontal or vertical composition.
- Compare board width and reveal because line density changes the visual effect.
- Measure the actual wall and check whether stock-board length favours one direction.
- Confirm the fixing surface: vertical installation may require additional horizontal backing for the selected product.
- Plan doors, windows, sockets, corners, baseboard or skirting and ceiling trim before cutting.
- Use a tape mock-up to test at least three or four representative joints.
- Run both orientations through the material calculator before ordering if waste or stock lengths could influence the decision.
- Follow the exact manufacturer's installation and environmental-use instructions.
If you want one simple rule, use horizontal shiplap when the room needs width and vertical shiplap when it needs height—but treat that as the first test, not the final verdict. The best direction is the one that works with the wall proportions, furniture, openings, board size and installation method at the same time. Mock up the lines, check the fixing requirements, calculate the real material quantity and then choose the version that still looks right when you step back across the room.