
Board and batten spacing usually goes wrong in the last few feet of the wall, not the first few. You choose a nice round spacing, mark 12, 16 or 18 inches repeatedly, and everything looks wonderfully organised until the final batten arrives beside the corner with a strange little leftover strip that clearly did not attend the planning meeting.
The fix is simple: do not force your preferred spacing across the wall. Treat it as a target, choose a whole number of battens and then redistribute the remaining wall width equally. The exact gap may change by a fraction of an inch or a few millimetres, but the finished wall will look intentional from one end to the other.
Quick answer: subtract the total width of all battens from the wall width, divide the remaining space by the number of gaps, and use that exact result for every gap. If battens sit at both wall edges, n battens create n − 1 gaps. If the layout has equal open spaces at both ends, n battens create n + 1 gaps.
Plan an even board and batten wall
Why the Tiny Last Gap Happens
A wall rarely divides perfectly into the batten width plus your favourite gap. If you simply start at one side and repeat a fixed measurement, the arithmetic remainder has to go somewhere. Unless you planned for it, that remainder normally appears at the far end as one narrow or oversized bay.
What happens on a 10 ft wall if you use nine 2.5 in battens and simply force 12 in clear gaps?
Answer: Nine battens occupy 22.5 in. Eight 12 in gaps occupy another 96 in. Together they use 118.5 in of a 120 in wall, leaving 1.5 in unaccounted for.
Explanation: That 1.5 in does not disappear. If the first batten is placed where planned and every following gap is forced to 12 in, the leftover width ends up at an edge. Recalculating all eight gaps to 12.1875 in uses the full wall evenly.
Clear Gap, On-Center Spacing and Batten Width Are Three Different Numbers
Before calculating anything, decide what you mean by spacing. DIY instructions often use the word spacing for two different measurements. Clear gap is the visible opening between the edges of two neighbouring battens. On-center or on-centre spacing is measured from the centre line of one batten to the centre line of the next.
Do not mix clear gap with centre spacing
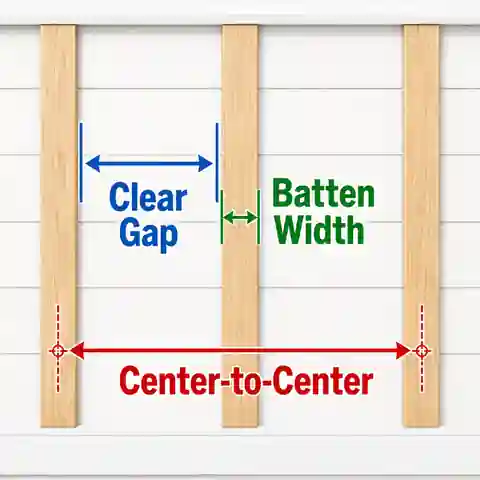
Clear gap is measured from the edge of one batten to the edge of the next.
On-center or on-centre spacing is measured from one batten centre line to the next.
Centre spacing equals the clear gap plus one full batten width.
Use the actual visible batten width, not only the nominal product name.
The measurements used in a board and batten layout
| Measurement | Meaning | Why it matters |
|---|---|---|
| Wall span | The finished width of one uninterrupted layout area | Controls the total space available for battens and gaps |
| Actual batten width | The visible face width of one vertical strip | Every batten removes this width from the open wall |
| Clear gap | Open wall visible between adjacent battens | Usually the easiest number to judge visually |
| On-center spacing | Centre line to centre line between battens | Useful for repeated tape-measure marks |
| Batten count | Whole number of vertical battens in the span | A wall cannot contain 8.4 battens, so the gap must adapt |
| End treatment | Battens at the edges or equal open end gaps | Changes the number of gaps in the formula |
If someone says “space the battens 16 inches apart,” ask whether that means a 16-inch clear gap or 16 inches on centre. With a 2.5-inch batten, those are not the same layout.
The Board and Batten Spacing Formula
The calculation is easiest when you work in one unit from start to finish. For US customary measurements, convert the wall to inches. For metric work, millimetres are convenient because they avoid small decimal metres. Then calculate the whole layout before rounding anything for the tape measure.
- Measure the finished wall span where the pattern will actually begin and end.
- Measure the actual face width of one batten.
- Choose whether the layout starts and ends with battens or with equal open spaces.
- Choose a batten count, or use a target gap to test nearby whole-number counts.
- Subtract the combined batten width from the wall width.
- Divide the remaining open width by the correct number of gaps.
- Add one batten width to the clear gap if you want centre-to-centre marking distance.
- Calculate every layout mark from the same reference edge rather than adding rounded measurements repeatedly.
Symbols
L = wall span
n = number of battens
w = actual batten face width
g = exact clear gap

Battens at both edges:
g = (L − n × w) ÷ (n − 1)

Equal open gaps at both ends:
g = (L − n × w) ÷ (n + 1)

Center-to-center spacing:
c = g + w
Formula when a batten sits at both outside edges
When the first batten starts at the left boundary and the last batten finishes at the right boundary, the spaces exist only between battens. Nine battens therefore create eight gaps; seven battens create six gaps.
A 10 ft wall is 120 in wide. The battens are 2.5 in wide and nine battens will be used, including one at each edge. What is the exact spacing?
Answer: The nine battens use 22.5 in. That leaves 97.5 in of open wall. Eight gaps must share that width, so each clear gap is 12.1875 in, or about 12 3/16 in. The centre-to-centre spacing is 14.6875 in, or about 14 11/16 in.
Explanation: The target might have been 12 in, but increasing every gap by only 0.1875 in spreads the 1.5 in remainder evenly and removes the tiny final strip.
Formula when you want equal open spaces at both ends
A floating layout can look better when the first and last battens do not touch the wall boundaries. In that arrangement, the open space before the first batten, every interior gap and the space after the last batten are equal. Seven battens create eight open spaces.
A 12 ft wall is 144 in wide. Seven battens are 3.5 in wide, and you want equal spaces at both ends. What is the clear gap?
Answer: The battens occupy 24.5 in, leaving 119.5 in of open wall. Seven battens with equal end spaces create eight gaps, so 119.5 ÷ 8 = 14.9375 in. Each gap is about 14 15/16 in.
Explanation: The pattern is centred because the two outside margins are treated as part of the same spacing system rather than as accidental leftovers.
Choose the edge treatment before calculating
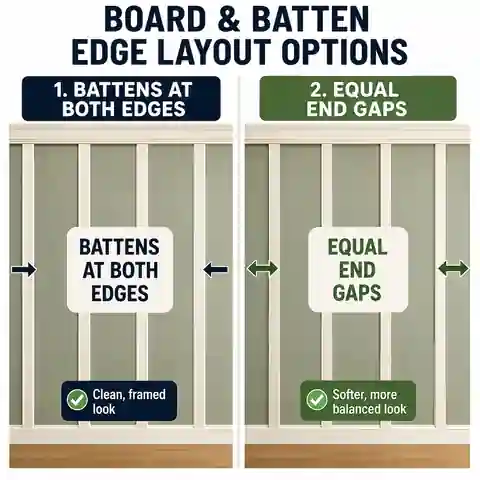
Edge-batten layout: the first and last battens touch the two layout boundaries, so n battens create n − 1 gaps.
Equal-end-gap layout: the pattern floats inside the wall with matching margins at both ends, so n battens create n + 1 gaps.
Neither option is automatically better. Choose the one that works with corners, casing, baseboards or skirting boards and the visual design.
Start With a Target Gap or Start With a Batten Count?
Both methods work, but they answer different design questions. A target gap is useful when you know roughly how dense you want the wall to look. A fixed count is useful when you already know that seven, eight or nine vertical lines look right around a bed, sofa, television, fireplace or other focal point.
Two sensible ways to begin the layout
| Start with | Best when | What to do next |
|---|---|---|
| Target clear gap | You know roughly how wide the open panels should look | Test nearby whole batten counts and choose the exact gap closest to your target |
| Fixed batten count | The number of vertical elements matters visually | Subtract their total width and divide the remaining wall evenly |
| Feature-centred layout | A bed, mirror, vanity or other feature dominates the wall | Choose the visual centre first, then balance the surrounding wall sections |
| Several separate wall spans | Doors, full-height casing or corners interrupt the pattern | Calculate each uninterrupted span separately unless the design intentionally continues through it |
Your target gap does not need to survive the calculation unchanged. If you asked for roughly 16 inches and the wall solves neatly at 15 7/8 inches, the difference is visually tiny. A 4-inch leftover bay at the corner is not.
How Far Apart Should Board and Batten Be?
There is no universal decorative spacing that fits every wall. Batten width, wall height, room size, furniture and whether the treatment is full-height or partial-height all change the proportions. Treat common spacing numbers as visual starting points, not as rules.
Visual starting points for interior decorative battens
| Approximate clear gap | Typical visual effect | Worth checking |
|---|---|---|
| 8–12 in / about 200–300 mm | Tighter rhythm with more vertical lines | Can feel busy on a small wall or with wide battens |
| 12–18 in / about 300–450 mm | Moderate spacing that suits many accent-wall proportions | Test the exact count against furniture and wall boundaries |
| 18–24 in / about 450–600 mm | Wider, calmer panels with fewer battens | Large gaps can look sparse on short or narrow walls |
| Custom spacing | Designed around a specific feature or panel count | Balance the complete composition rather than chasing a familiar number |
These ranges are design examples for interior decorative trim, not structural or exterior-siding requirements. Exterior board-and-batten systems have product-specific coverage, joints, fastening, drainage and weatherproofing details.
Quick Spacing Table for Common Wall Widths
The table below is only a quick visual reference. It assumes 2.5 in actual-width battens, a batten at each outside edge and a target clear gap close to 16 in. Real walls should still be measured and calculated from their finished dimensions.
Example layouts using 2.5 in battens and a target near 16 in
| Wall width | Battens | Exact clear gap | Centre-to-centre |
|---|---|---|---|
| 6 ft / 72 in | 5 | 14.875 in (14 7/8 in) | 17.375 in (17 3/8 in) |
| 8 ft / 96 in | 6 | 16.20 in (about 16 3/16 in) | 18.70 in (about 18 11/16 in) |
| 10 ft / 120 in | 7 | 17.083 in (about 17 1/16 in) | 19.583 in (about 19 9/16 in) |
| 12 ft / 144 in | 9 | 15.1875 in (15 3/16 in) | 17.6875 in (17 11/16 in) |
| 14 ft / 168 in | 10 | 15.889 in (about 15 7/8 in) | 18.389 in (about 18 3/8 in) |
| 16 ft / 192 in | 11 | 16.45 in (about 16 7/16 in) | 18.95 in (about 18 15/16 in) |
A wall called “10 feet” may measure 119 5/8 inches after finishes, corner build-up and casing. Use quick tables for ideas; use the real tape-measure number for the final marks.
Metric Example: The Same Method Works in Millimetres
A wall is 2,750 mm wide. Battens are 45 mm wide, you want a clear gap near 350 mm, and battens will sit at both edges. What layout works?
Answer: Eight battens occupy 360 mm, leaving 2,390 mm of open wall. Eight battens at both edges create seven gaps. Dividing 2,390 by 7 gives an exact clear gap of about 341.4 mm. Centre-to-centre spacing is about 386.4 mm.
Explanation: The exact gap is only 8.6 mm smaller than the 350 mm design target, and the difference is shared evenly across the whole wall rather than appearing as one narrow final bay.
Measure the Finished Wall, Not the Wall You Imagine
Good spacing math cannot rescue the wrong wall measurement. Decide exactly where the pattern begins and ends. A corner, door casing, wardrobe, chimney breast, column, skirting return or built-in unit can change the usable width even when the room dimensions stay the same.
Measure one uninterrupted design span at a time
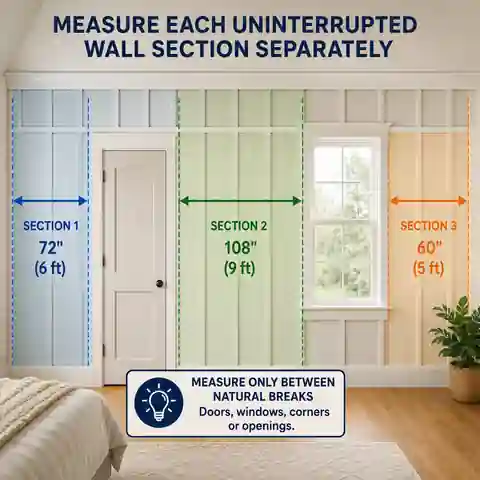
Measure between the exact visual boundaries of each continuous pattern.
Treat full-height doors, wide casing and corners as separate spans unless the design deliberately continues across them.
Small sockets, outlets and switches normally affect cutting and placement rather than the basic width calculation.
Measure at the height where the battens will sit if the walls are noticeably out of square.
- Measure the finished span at more than one height if the wall is visibly uneven.
- Decide whether an outside batten meets the corner, casing or another trim piece.
- Record the actual batten width from the material you will install.
- Mark major furniture or fixtures so a batten does not land awkwardly beside a centred feature.
- Sketch doors, windows and full-height breaks before choosing one long spacing pattern.
- Use painter's tape for a quick full-wall mock-up before cutting a large batch of trim.
Doors, windows, corners and outlets need different treatment
How common wall interruptions affect the layout
| Wall feature | Typical planning approach | Why |
|---|---|---|
| Full-height doorway with casing | Usually split the wall into separate visual spans | The casing already creates a strong vertical boundary |
| Window | Check whether the pattern should terminate, continue or centre around it | Window trim can dominate the visual rhythm |
| Inside or outside corner | Choose the corner treatment before solving spacing | The visible width of the end trim changes the usable span |
| Socket, outlet or switch | Keep the main pattern, then plan the local cut or relocation with appropriate electrical work | Small devices rarely justify distorting every gap on the wall |
| Built-in cabinet or wardrobe | Use its finished edge as a layout boundary when it permanently interrupts the wall | The visible wall span is more important than the hidden room dimension |
| Fireplace, vanity, bed or television | Consider centring a panel or batten on the feature | Visual balance may matter more than matching the same gap used on another wall |
Do Board and Batten Strips Have to Line Up With Wall Studs?
Decorative batten spacing and structural stud spacing solve different problems. The battens are arranged for the visible wall design; studs or other framing members are positioned for the wall construction. They will not automatically line up, and forcing decorative spacing to match framing can create an awkward-looking pattern.
The correct fastening method depends on the wall substrate, trim material, adhesive or fastener system, hidden services and the manufacturer's instructions. If your installation depends on fastening into studs, locate them first and plan the attachment method without silently changing the decorative spacing.
Do not assume a decorative batten mark is a safe drilling or nailing point. Locate wiring, plumbing and suitable fixing locations before fastening trim.
Mark Every Batten From One Reference Edge
Even correct spacing can drift if every new batten is measured from the previous one. A small rounding, pencil or tape error then becomes the starting point for the next measurement. By the ninth batten, several tiny errors can become one very visible mismatch.
- Choose one reference edge of the wall.
- Calculate the exact centre or left-edge position of every batten from that same reference.
- Keep full precision in the calculation and round only the marks you actually need to transfer.
- Mark all positions lightly before fastening anything.
- Use a level or laser to carry each mark vertically.
- Check the predicted position of the final batten before committing to the full wall.
- Stand back and check the composition from normal viewing distance.
One reference edge prevents accumulated error
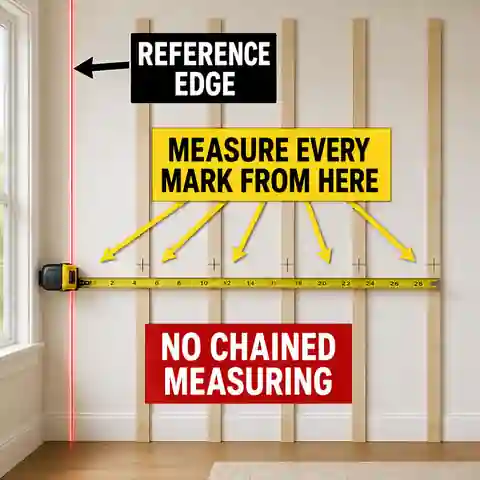
Calculate a complete list of marks before installation.
Measure each mark from the same wall edge rather than from the previous batten.
A small error at one mark then stays local instead of pushing every later batten farther away.
Confirm the final mark against the opposite boundary before permanent fastening.
Use the Actual Batten Width
Every batten occupies part of the wall, so its real face width belongs in the formula. Nominal lumber names, moulding descriptions and metric product labels do not always equal the visible installed width. Even a small difference multiplied by eight or ten battens changes the final spacing.
Do not let the product name replace a measurement
| Material description | Planning mistake | Better approach |
|---|---|---|
| Nominal 1×3 or similar timber | Entering 3 in without checking | Measure the actual face; surfaced North American 1×3 is commonly around 2.5 in, but verify your stock |
| Nominal 1×4 or similar timber | Assuming the name is the installed face width | Measure the actual board before calculating |
| Planed metric strip | Using the rough or catalogue size automatically | Use the finished dimension supplied or measured |
| MDF trim or moulding | Assuming every product in the range has identical width | Measure the exact profile selected for the wall |
| Ripped custom strips | Using the intended saw setting as the final width | Measure a few finished pieces after cutting |
If the trim is already in the room, measure it. A ten-second measurement is more reliable than a very confident product name.
What If the Wall Is Not Straight or Square?
Real walls can taper, corners can be out of plumb and skirting boards or baseboards can wander slightly. The spacing calculation still needs one defined layout width, but the installation should acknowledge what the eye will actually see. Measure near the main field of the design, compare the width at several heights and mock up the pattern before cutting every strip.
- Use a level or laser for the battens; do not copy a crooked corner blindly.
- Check whether the first and last battens can absorb small wall irregularities without looking different.
- Balance visible end conditions rather than hiding the entire discrepancy in one gap.
- Dry-fit or tape the layout before painting and fastening.
- For severely uneven walls or complex trim junctions, solve the geometry on the actual wall rather than relying on a simple rectangular sketch.
Spacing First, Material Quantity Second
Once the batten count is settled, the basic vertical material quantity is easy to estimate. Multiply the number of vertical battens by their finished height. Add top rails, bottom rails, ledges or other horizontal trim separately because their lengths and stock cuts are different.
Vertical batten length = batten count × finished batten height

Total trim length = vertical batten length + horizontal rails + other named trim

Purchase quantity = total trim length + a project-specific allowance, then converted into the stock lengths actually sold
If a layout uses nine vertical battens that are each 8 ft high, how much vertical trim is in the finished wall?
Answer: Nine × 8 ft = 72 linear ft of vertical batten before cutting allowance, defects or additional horizontal rails.
Explanation: Linear footage is only the first purchasing number. Eight-foot, ten-foot or other stock lengths still need to be matched to a real cut plan.
After the trim is installed, paint quantity depends on the wall area, coats, product coverage and the extra surface created by the battens. For a separate paint estimate, use the wall-paint tool rather than guessing from the trim length.
Estimate paint for the finished wall with the HomDera Wall Paint CalculatorCommon Board and Batten Spacing Mistakes
Mistake, result and better approach
| Mistake | What happens | Better approach |
|---|---|---|
| Repeating a favourite gap from one side | The remainder becomes a narrow or wide final bay | Recalculate one exact equal gap for the full span |
| Confusing clear gap with on-centre spacing | The finished panels are much wider or narrower than expected | Define the measurement before calculating |
| Ignoring batten width | Every gap is wrong because the trim itself occupies wall space | Subtract the combined actual batten width first |
| Using nominal board width | A small width error is repeated across the wall | Measure the visible finished face |
| Counting the wrong number of gaps | The formula produces a layout that cannot physically fit | Use n − 1 with edge battens and n + 1 with equal end gaps |
| Measuring each batten from the previous one | Rounding and marking errors accumulate | Reference every mark from one wall edge |
| Treating a doorway as invisible | The pattern looks interrupted or awkward around casing | Plan separate visual spans where appropriate |
| Forcing battens onto stud centres | The visible design may become uneven | Treat decorative layout and fastening strategy as separate decisions |
| Cutting every batten before mocking up the wall | A mathematically valid layout may still look wrong around furniture | Use painter's tape or temporary marks first |
| Using an interior spacing guide for exterior siding | Weatherproofing and product requirements are ignored | Follow the exterior system instructions |
Complete 10 ft Wall Example With Layout Marks
Example inputs
| Input | Value | Planning note |
|---|---|---|
| Wall span | 120 in / 10 ft | Finished uninterrupted width |
| Batten width | 2.5 in | Actual visible face width |
| Target gap | About 12 in | Design preference, not a fixed result |
| Edge treatment | Batten at both edges | First and last battens touch the layout boundaries |
| Selected batten count | 9 | Creates 8 equal gaps |
- Combined batten width: 9 × 2.5 = 22.5 in.
- Open wall width: 120 − 22.5 = 97.5 in.
- Number of gaps: 9 − 1 = 8.
- Exact clear gap: 97.5 ÷ 8 = 12.1875 in.
- Centre-to-centre spacing: 12.1875 + 2.5 = 14.6875 in.
- First batten centre: 1.25 in from the left boundary.
- Following centres are calculated from the same left reference at 15.9375, 30.625, 45.3125, 60, 74.6875, 89.375, 104.0625 and 118.75 in.
- The final batten finishes exactly at 120 in, so there is no mystery leftover gap.
You do not need to transfer every decimal exactly as written. Keep full precision in the calculation, then convert the final marks to sensible tape-measure fractions or millimetres while checking the final position before fastening.
Frequently Asked Questions
How do I calculate equal board and batten spacing?
Choose a whole batten count, subtract the combined batten width from the wall span and divide the remaining width by the number of open gaps. With battens at both edges, divide by one fewer than the batten count. With equal open end spaces, divide by one more than the batten count.
How far apart should board and batten strips be?
There is no single decorative spacing that is correct for every interior wall. Many designs begin by testing clear gaps somewhere around 8–24 in or roughly 200–600 mm, then adjust the count to suit the wall proportions. The final exact spacing should be chosen for the room, batten width and visual layout rather than copied as a universal rule.
What is the difference between clear spacing and on-center spacing?
Clear spacing is the visible opening between two batten edges. On-center or on-centre spacing is the distance between their centre lines. On-centre spacing equals the clear gap plus one batten width.
How many battens do I need for a 10 ft wall?
It depends on the batten width, desired gap and edge treatment. For example, a 120 in wall with 2.5 in battens and a target gap around 12 in can use nine battens at the two edges, producing eight exact gaps of 12.1875 in. A different target or batten width produces a different count.
Do the battens need to be installed over wall studs?
Not as a spacing rule. Decorative batten positions and structural stud positions are separate layouts. The required fastening method depends on the substrate, trim and fixing system, so locate suitable fixing points and hidden services before installation.
Should I put a batten in each corner?
Only if that edge treatment suits the design. Battens at both edges create a framed appearance and use n − 1 internal gaps. A floating pattern with equal open end spaces can look lighter and uses n + 1 gaps. Decide which finish works with the actual corners and adjacent trim before calculating.
Why is my exact gap different from the spacing I wanted?
Because a wall must contain a whole number of battens. The target is used to choose a practical count, then the remaining width is redistributed equally. A small difference between the target and exact gap is what prevents one leftover space at the far end.
Should I measure each new batten from the previous one?
It is safer to calculate every position from one fixed reference edge. Chaining measurements allows small rounding and marking errors to accumulate across the wall.
Can I use the same formula for metric measurements?
Yes. Use millimetres for the wall span, batten width and gap, then apply exactly the same formulas. Do not mix inches and millimetres within one calculation.
Can I use this method for exterior board and batten siding?
The geometry can help explain equal spacing, but an exterior siding system also depends on board coverage, batten overlap or reveal, joints, openings, flashing, ventilation or drainage, fastening and manufacturer requirements. Do not use an interior decorative layout article as the installation specification for exterior cladding.
Final Board and Batten Layout Check
- The measured width is the finished uninterrupted wall span.
- The actual batten face width has been measured.
- Clear gap and on-centre spacing are not being confused.
- The edge treatment is decided before the formula is used.
- The batten count is a whole number and the gap is recalculated to fit.
- Doors, casing, corners and fixed furniture have been considered visually.
- Every mark is referenced from the same wall edge.
- The final batten position has been checked before permanent fastening.
- A tape or pencil mock-up looks balanced from normal viewing distance.
- Fastening points and hidden services are checked separately from decorative spacing.
- Exterior siding is being designed from the applicable product system rather than this interior trim guide.
The best board and batten layout is usually not the one with the roundest number. It is the one where the full wall looks balanced and nobody can tell that the 12-inch idea quietly became 12 3/16 inches. Solve the entire span first, share the remainder across all the gaps and mark every batten from one reference edge. The last gap then becomes just another gap—which is exactly the amount of drama a wall should contain.
Open the HomDera Board and Batten CalculatorHow HomDera handles assumptions, unit conversions and rounding