

A wood slat wall looks simple because the finished pattern is simple: slat, gap, slat, gap, repeat. The planning is less forgiving. A difference of only a few millimetres or a fraction of an inch may seem harmless at the first slat, but repeated forty or sixty times it can leave a noticeably different space at the far end of the wall.
The most useful way to plan a slat wall is to treat the gap as a design target rather than an untouchable number. Pick the slat face width and the spacing you like, decide how the field should finish at both edges, then recalculate the gap slightly so every space is equal. This guide shows that process in both imperial and metric units, explains what different slat proportions look like, and turns the finished layout into a practical material count.
Quick answer: for many DIY interior accent walls using slats around 1–1½ in (25–40 mm) wide, a clear gap around 1/2–3/4 in (12–20 mm) is a useful range to mock up first. It is not a standard. Narrower gaps look denser and use more slats; wider gaps look lighter and use fewer. The best final gap is the one that suits the room and divides the actual wall field evenly.
From a gap you like to a wall that actually finishes evenly
What Is the Best Gap Between Wood Slats?
There is no universal wood slat spacing because the gap is part of the design. The same 3/4 in gap can feel narrow beside a 3 in slat and very open beside a 3/4 in slat. Room size, wall colour, timber tone, lighting and the total number of vertical lines all change the result. For a typical DIY accent wall, it is more useful to compare three visual zones than to search for one official measurement.
Practical starting ranges for decorative slat spacing
| Clear gap | How it usually reads | What changes |
|---|---|---|
| About 3/8–1/2 in / 10–12 mm | Tight, dense and strongly textured | More slats, more cuts and more material; the background becomes less visible |
| About 1/2–3/4 in / 12–20 mm | Balanced for many narrow decorative slat walls | A useful mock-up range when slats are roughly 1–1½ in / 25–40 mm wide |
| About 3/4–1 in / 20–25 mm | More open, with stronger shadow lines | Fewer slats and more visible background between them |
| Over 1 in / 25 mm | Clearly open or screen-like depending on slat width | Best judged with a full-size sample because the wall can begin to read as separate strips rather than one surface |
Make a sample with three or four slats before buying the full quantity. A 6 ft photo viewed on a phone cannot tell you how a 5/8 in gap will feel from the sofa across your actual room.
Narrow, medium and wide gaps change the same slat wall
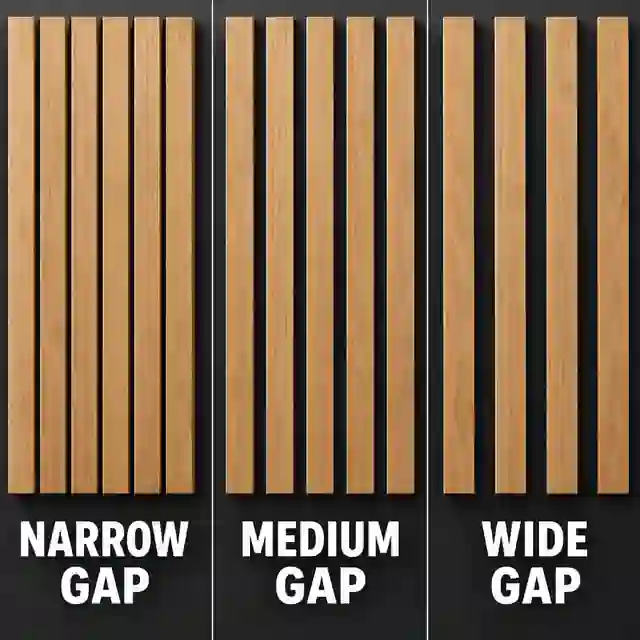
Keep the slat face width identical in all three samples so the gap is the only changing variable.
A narrow gap creates more timber surface and a denser rhythm.
A medium gap gives a balanced mix of timber and background for many accent walls.
A wide gap exposes more of the wall behind and makes each slat read more independently.
Judge the samples from the normal viewing distance, not only from 12 inches away.
Slat Width Matters as Much as the Gap
Slat face width is the dimension you see from the front. It is different from slat depth, which projects away from the wall. A narrow face produces many vertical lines and a fine rhythm. A wider face feels heavier and usually needs either a wider gap or a lower slat count to avoid making the wall visually crowded.
How common DIY slat proportions change the look
| Example slat face | Example gap to test | Typical visual effect |
|---|---|---|
| 3/4–1 in / 18–25 mm | 3/8–5/8 in / 10–16 mm | Fine, closely repeated lines; useful where you want a detailed texture |
| 1–1½ in / 25–40 mm | 1/2–3/4 in / 12–20 mm | Balanced contemporary accent-wall rhythm |
| 1½–2½ in / 40–65 mm | 5/8–1 in / 16–25 mm | Bolder vertical strips with fewer repetitions |
| Over 2½ in / 65 mm | Mock up before deciding | Begins to read more like broad battens or wall panelling than a fine slat screen |
Do not choose the slat width from the nominal name of a board alone. A product sold as a 1×2 does not necessarily present a 2 in face after milling, and decorative MDF strips can be cut to almost any width. Measure the actual finished face that will be visible, especially if several batches or pre-finished products are being combined.
The Two Formulas That Make the Spacing Come Out Even
First define the usable field width. This is the part of the wall in which the repeating slats will actually sit after any fixed side margins have been removed. Then choose how the field should end. The arithmetic is different when you want equal open gaps at both sides and when you want a slat touching both field boundaries.
F = usable slat field width
N = number of slats
W = actual slat face width
G = exact clear gap

Equal end gaps:
F = N × W + (N + 1) × G
G = (F − N × W) ÷ (N + 1)

Slat at both field edges:
F = N × W + (N − 1) × G
G = (F − N × W) ÷ (N − 1)

On-center spacing for a constant rhythm:
C = W + G
A 10 ft wall has 4 in fixed margins at both sides. Using 1.25 in slats and a target gap of 5/8 in, how can the field finish with equal end gaps?
Answer: The usable field is 120 − 8 = 112 in. A target gap of 0.625 in suggests about 59 slats. With 59 slats, the exact equal gap becomes (112 − 59 × 1.25) ÷ 60 = 0.6375 in. The visual difference from the 5/8 in target is tiny, but the first gap, every internal gap and the final gap are now identical.
Explanation: The target gap helps choose a sensible whole-number slat count. The exact gap is then recalculated from the real field width so the layout closes cleanly.
What does the same process look like on a 3,000 mm wall with 100 mm side margins, 30 mm slats and a 15 mm target gap?
Answer: The usable field is 2,800 mm. A count of 62 slats is close to the 15 mm target. The exact equal-end gap is (2,800 − 62 × 30) ÷ 63 = about 14.92 mm. The on-center spacing is therefore about 44.92 mm.
Explanation: Changing a nominal 15 mm gap to 14.92 mm is invisible in normal viewing, while allowing all 63 spaces across the field to match.
Choose the Edge Treatment Before You Calculate the Count
The edge condition is part of the design, not a correction to make after the middle has been installed. A centred feature behind a bed or TV often looks clean with matching open spaces at both ends. A full-wall treatment may look more intentional with a slat at each field boundary, especially when the edges meet casing or another deliberate trim line.
Two clean ways to finish a slat field
| Edge treatment | What happens at the sides | Good situations |
|---|---|---|
| Equal end gaps | The gap before the first slat equals the gaps between slats and the gap after the last slat | Centred feature fields, headboards, TV walls and layouts with visible margins |
| Slats at both field edges | The first and last slats sit on the field boundaries; only internal gaps are repeated | Full wall runs or fields intentionally bounded by trim, casing or a corner detail |
| Fixed outer margin + equal end gaps | A deliberate margin is reserved first, then the internal field receives equal gaps | Walls with furniture, curtains, corner clearance or a designed frame around the slats |
The same wall width can finish in two different ways
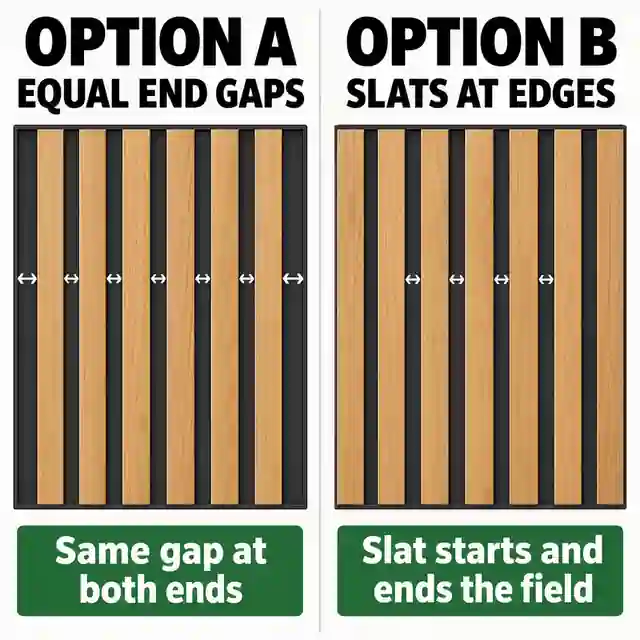
Option A uses equal open spaces before, between and after the slats.
Option B places a slat at each outer boundary and divides only the internal spaces.
Both are mathematically correct; the better choice depends on how the slat field meets corners, trim and furniture.
Do not switch edge rules halfway through the calculation or the count will no longer match the drawing.
Clear Gap vs On-Center Spacing: Do Not Mix Them Up
The clear gap is the visible empty space between the faces of two neighbouring slats. On-center spacing is the distance from the centreline of one slat to the centreline of the next. When all slats have the same face width and every gap is equal, on-center spacing is simply slat width plus clear gap.
On-center spacing = slat face width + clear gap

Example:
1.25 in slat + 0.6375 in gap = 1.8875 in on-center

30 mm slat + 14.92 mm gap = 44.92 mm on-center- Mark one reliable starting reference instead of measuring each slat from the previous slat.
- Use a laser or level to establish the first plumb line.
- Mark repeated centreline or edge positions from the same datum whenever possible.
- Use a physical spacer as an installation aid, but make the spacer to the calculated exact gap.
- Recheck plumb and overall position every few slats so a small error does not travel across the wall.
- Confirm the final slat position before fixing the last several pieces permanently.
Do not let the spacer become the only measuring tool. A spacer repeats local distance; it does not know whether the first slat was plumb or whether a small fixing error has accumulated across forty pieces.
Plan Margins, Outlets and Furniture Before the Slat Rhythm
A mathematically perfect pattern can still be awkward if a slat lands through the centre of a switch plate, stops 1/4 in from a door casing or disappears behind half of a wall-mounted television bracket. Before solving the count, draw the real field boundaries and mark every object that can affect the installation.
- Door and window casing or architraves
- Baseboards or skirting boards and any top trim
- Sockets, outlets, switches and data plates
- Wall lights, thermostats, sensors and controls
- Radiators, heaters, air vents and return grilles
- TV brackets, shelves, headboards and fixed cabinetry
- Curtain stacks or blinds that need side clearance
- Inside and outside corners where a full slat may look cleaner than a narrow leftover strip
Do not move, cover or notch around electrical boxes, wiring, plumbing, heat sources, vents or life-safety devices without checking the applicable installation rules. A decorative layout does not override required access, clearances or safe fixing locations.
How Many Slats Do You Need?
Slat count comes from usable field width, slat face width, edge treatment and the gap you are trying to achieve. Smaller gaps increase the count quickly because the difference is repeated across the entire wall. That is why testing several nearby counts is often more useful than forcing one exact gap dimension.
Example: 10 ft wide field with 1.25 in slats and equal end gaps
| Target clear gap | Whole slat count to test | Exact equal gap after recalculation |
|---|---|---|
| 1/2 in | 68 slats | About 0.507 in |
| 5/8 in | 64 slats | About 0.615 in |
| 3/4 in | 60 slats | About 0.738 in |
Vertical or Horizontal Slats?
Most DIY slat accent walls are vertical because long uninterrupted lines are easy to read and the repeated spacing can visually emphasise room height. Horizontal slats create a different effect and can make the wall feel broader, but they also change where joints, supports and wall obstacles fall. Direction is mainly a design choice; it should not be used to hide an installation method that does not properly support the material.
Vertical and horizontal slat layouts compared
| Direction | Visual effect | Planning issue |
|---|---|---|
| Vertical | Strong height and repeated upright rhythm | Check ceiling and floor cuts, base trim, top margin and plumb |
| Horizontal | Broader layered lines across the wall | Check long level lines, butt joints, supports and how the courses meet corners |
| Partial-height field | Can behave like a decorative headboard or feature panel | The top termination becomes a major visible detail |
| Ceiling continuation | Creates a dramatic wraparound feature | Requires ceiling-appropriate fixing and product suitability rather than simply continuing wall adhesive overhead |
DIY Individual Slats Are Not the Same as Acoustic Slat Panels
A DIY slat wall made from separate timber or MDF strips is primarily a decorative surface unless an acoustic assembly has been deliberately designed behind it. Pre-made acoustic slat panels are different products: the slats are fixed to a backing such as felt, the pitch is manufactured into the panel, and acoustic performance depends on the tested panel and the way it is mounted.
Custom individual slats vs pre-made acoustic panels
| Question | Individual DIY slats | Pre-made acoustic slat panels |
|---|---|---|
| Can you choose the gap freely? | Yes, within the practical limits of the material and design | Usually no; internal spacing is part of the manufactured panel |
| How is quantity estimated? | By wall field, slat width, exact gap, margins and stock yield | Usually by panel coverage and the manufacturer's joint detail |
| Is it automatically acoustic? | No | Only to the performance supported by the specific tested product and installation |
| What controls the panel-to-panel joint? | Not applicable | Manufacturer instructions; the joint must preserve the intended visual pitch |
If you are installing pre-made slat panels, do not replace the manufacturer's pitch or panel-joint gap with a generic spacing table from a DIY slat wall. The factory geometry is part of the product.
Solid Wood, MDF or Plywood Slats?
Material choices for a DIY slat wall
| Material | Advantages | What to watch |
|---|---|---|
| Solid timber | Real grain, stain-friendly edges and a natural finish | Can vary in straightness and moisture content; acclimation and movement matter |
| Paint-grade MDF | Very consistent width and smooth painted finish | Edges need preparation; standard MDF is not a good choice for direct water exposure |
| Plywood strips | Can be economical when ripped from sheets and can create an intentional layered edge | Saw kerf affects sheet yield and exposed plies may need finishing |
| Veneered composite slats | Consistent appearance with real-wood surface options | Cut edges and product-specific finishing need to be planned |
| Pre-finished slats | Less finishing work on the wall | Protect the finish during cutting and confirm colour consistency before installation |
For sheet-ripped slats, material yield is not simply sheet width divided by slat width. Every saw cut removes material. On a wall with dozens of strips, a 1/8 in or 3 mm kerf repeated across several sheets can change the purchasing quantity. The HomDera calculator therefore treats saw kerf as a separate input when slats are ripped from MDF or plywood.
Fix the First Slat Like the Rest of the Wall Depends on It
- Check the substrate and decide how the slats will be fixed before finishing the material.
- Paint or finish the visible background before installing closely spaced slats.
- Mark the true field boundaries and the first calculated reference line.
- Use a level or laser to make the first slat genuinely plumb or level.
- Use the exact calculated spacer and the layout marks together.
- Check the pattern against outlets, casing and furniture before reaching them.
- Recheck the next major reference mark every several slats.
- Leave the last few slats loose until the closing gap has been confirmed.
- Use fixings, adhesive or a mounting system suitable for the substrate, slat material and product instructions.
A decorative slat is not structural framing. Do not hang heavy objects from it unless the load is transferred to suitable framing, anchors or another support system designed for that load. Check for hidden wiring and plumbing before drilling or nailing.
A reliable installation uses both a reference line and a spacer
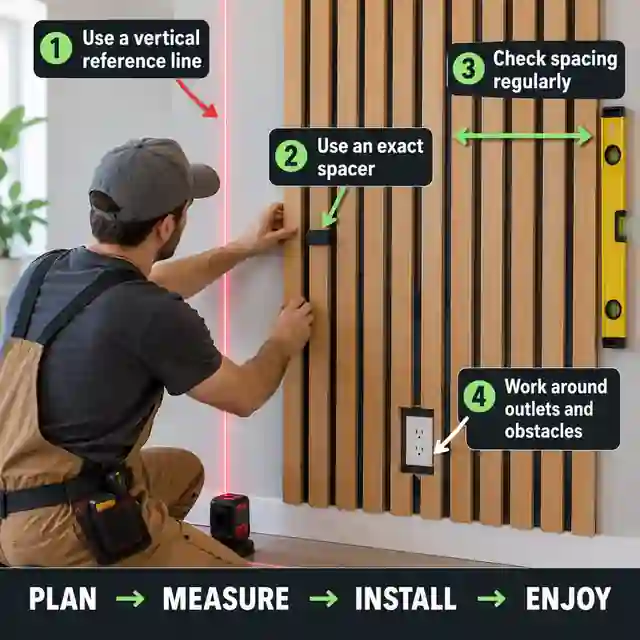
Start from one measured datum rather than allowing every new slat to inherit the previous slat's error.
Use a laser or long level to keep the first piece and regular checkpoints aligned.
A physical spacer makes installation fast after the exact gap has already been calculated.
Mark electrical plates and other interruptions before the rhythm reaches them.
Check the final several positions before permanent fixing so the closing edge stays intentional.
Background Colour Changes the Perceived Spacing
The wall visible between the slats becomes part of the pattern. A dark background behind medium or light timber creates deep shadow-like lines and can make a moderate gap look narrower. A pale wall behind dark slats creates stronger contrast and can make every space more obvious. If you plan to paint the background, do it before installation; brushing forty narrow channels afterwards is a punishment, not a decorating technique.
How the background changes the same geometry
| Slats | Background | Likely visual effect |
|---|---|---|
| Light or medium timber | Black or charcoal | Deep, graphic shadow lines and strong slat definition |
| Natural timber | Similar warm neutral | Softer, calmer pattern with less contrast |
| Dark slats | Light wall | Very pronounced striping; gaps become a major part of the design |
| Painted slats | Same colour as wall | Texture dominates more than colour contrast |
Common Wood Slat Wall Spacing Mistakes
What goes wrong and how to avoid it
| Mistake | What it causes | Better approach |
|---|---|---|
| Choosing one gap and repeating it without checking the total field | A noticeably different final gap | Use the target to choose a whole slat count, then recalculate the exact gap |
| Using nominal board size instead of actual face width | Every repeated position shifts slightly | Measure the finished slat face |
| Forgetting the two side margins | The field becomes wider than the design | Subtract fixed margins before solving the repeated layout |
| Confusing clear gap with on-center spacing | Layout marks do not match the visible openings | Remember that on-center = slat width + clear gap |
| Measuring every new slat only from the previous one | Small errors accumulate across the wall | Reference regular marks from one datum and recheck with a laser or level |
| Designing through an outlet or switch | Awkward notches or unsafe alterations appear late in the job | Plot all wall obstacles before choosing the final count |
| Ignoring saw kerf when ripping sheet material | The last strips no longer fit on the planned sheets | Include blade kerf in the sheet-yield calculation |
| Assuming decorative slats are acoustic panels | Expected sound improvement may not occur | Use a tested acoustic product or a deliberately designed acoustic assembly when sound performance matters |
Wood Slats, Board and Batten and Wainscoting Are Different Layout Problems
These wall treatments can all use repeated vertical trim, but they should not share one spacing rule. A slat wall normally uses many narrow strips and small repeated gaps. Board and batten uses wider battens and much larger bays. Wainscoting adds horizontal rails and panel proportions. If your design begins to use broad vertical members with large open sections, you may be solving a board-and-batten wall rather than a slat wall.
Using wider battens and larger wall bays? See the Board and Batten Spacing GuidePlanning rails and framed panels instead? See the Wainscoting Height and Panel Spacing GuideFrequently Asked Questions
What is a good gap between wood slats?
For many decorative DIY walls with narrow slats, roughly 1/2–3/4 in (12–20 mm) is a useful range to test first. Wider and narrower gaps can both work. Mock up the actual slat width with the real wall colour, then adjust the gap to make the complete field divide evenly.
How many slats do I need for a 10-foot wall?
It depends on slat width, gap, side margins and edge treatment. As one example, a full 120 in field using 1.25 in slats and a target gap near 5/8 in works well with about 64 slats when equal end gaps are used; the exact recalculated gap is about 0.615 in. Different dimensions produce a different count.
Do wood slat walls improve acoustics?
Separate decorative slats fixed to a hard wall should not be assumed to provide meaningful acoustic absorption. Purpose-made acoustic slat panels use backing materials and specific assemblies, and their performance depends on the tested product and installation. If acoustics are a project requirement, choose the system from verified acoustic data rather than appearance alone.
Final Slat Wall Check Before You Cut
- The actual slat face width has been measured.
- The wall width has been separated from the usable slat field width.
- Fixed left and right margins are intentional.
- The target gap has been tested at full scale.
- A whole-number slat count has been selected.
- The exact gap has been recalculated for that count.
- The edge treatment is defined: equal end gaps or slats at the field edges.
- Clear gap and on-center spacing have not been confused.
- Door casing, outlets, switches, vents, furniture and brackets are marked on the layout.
- The first reference line is plumb or level.
- Stock length or sheet yield includes a sensible material allowance.
- Saw kerf is included when ripping MDF or plywood.
- The background wall is finished before narrow gaps become difficult to reach.
- Fixings suit the substrate and hidden services have been checked.
- The last several slat positions have been confirmed before permanent fixing.