

Wainscoting can look perfectly natural in one room and oddly heavy in another even when both were installed at exactly the same height. That is because the eye does not read the number on a tape measure first. It reads proportion: how much wall remains above the panels, where the windows begin, how tall the doors feel, and whether the top rail cuts through furniture, switches or other horizontal lines.
The practical way to choose the height is to begin with a proportion, not a fixed number. Around one-third of the wall height is a useful traditional starting point for lower-wall wainscoting. From there, move the line up or down to suit the room and then mock it up before cutting anything. Painter's tape is much cheaper than discovering that a beautiful top rail runs directly through a light switch.
Quick answer: start near one-third of the finished wall height. That is about 32 in for an 8 ft ceiling, 36 in for a 9 ft ceiling, 40 in for a 10 ft ceiling, 800 mm for a 2.4 m wall, 900 mm for 2.7 m and 1,000 mm for 3.0 m. Treat these as starting points, not fixed rules.
This guide uses wainscoting for lower-wall decorative panelling or paneling with rails and stiles. Terminology varies by region: baseboard is commonly called skirting board in the UK and several other markets, while molding and moulding describe the same general trim family.
Choose the height first, then make the panels fit
Start With One-Third of the Wall, Not a Universal 36 Inches
Thirty-six inches is often quoted because it works nicely in many rooms, especially where the ceiling is around 9 ft. But it is not a universal answer. On an 8 ft wall, 36 in is already 37.5% of the height. On a 10 ft wall it is only 30%. The same measurement therefore creates a different visual balance in each room.
One-third starting height for common wall heights
| Finished wall or ceiling height | One-third starting point | Practical interpretation |
|---|---|---|
| 8 ft / 96 in | 32 in / about 813 mm | A classic lower-wall proportion; often adjusted slightly for trim and room features |
| 9 ft / 108 in | 36 in / about 914 mm | A very common starting height for dining rooms, living rooms and halls |
| 10 ft / 120 in | 40 in / about 1,016 mm | Keeps the lower section proportional without making tall walls look under-scaled |
| 2.4 m | 800 mm | Useful starting point in many UK, European and Australian homes |
| 2.7 m | 900 mm | A balanced starting line for a slightly taller room |
| 3.0 m | 1,000 mm | Often looks more proportional than using a fixed 900 mm line on a tall wall |
Measure to the finished top of the wainscoting assembly or cap rail that creates the visible horizontal line. Do not calculate one-third to the top of the panel opening and then add a thick rail above it without checking the final proportion.
The same 36-inch line looks different under different ceilings
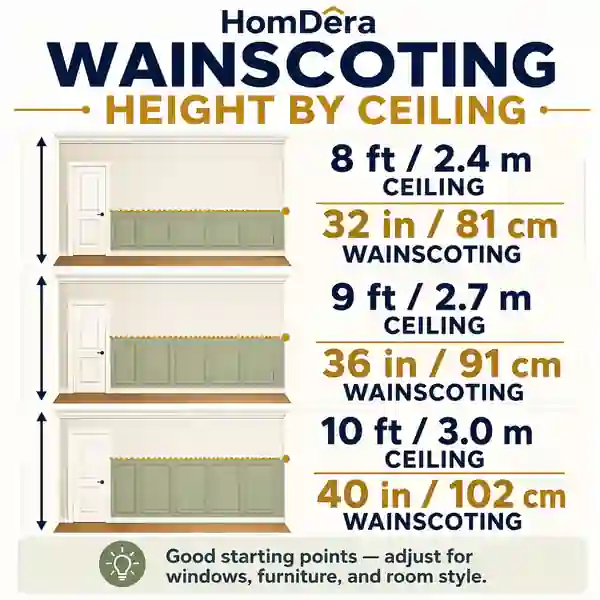
An 8 ft wall reaches its one-third point at 32 in.
A 9 ft wall reaches one-third at 36 in.
A 10 ft wall reaches one-third at 40 in.
Metric walls follow exactly the same proportion: 2.4 m → 800 mm, 2.7 m → 900 mm, 3.0 m → 1,000 mm.
The useful lesson is not the exact number. It is that the top line should respond to the wall height rather than being copied from another room.
What Does Wainscoting Height Actually Measure?
Before comparing dimensions, decide which line you are measuring. In a framed rail-and-stile layout, the finished wainscoting height is normally the visible top of the lower-wall composition. That may be the top rail itself, a chair rail or a separate cap moulding fixed above it.
The vertical parts of a typical wainscoting assembly
| Part | Where it sits | Why it matters to height |
|---|---|---|
| Baseboard / skirting board | At floor level | May form part of the visual lower assembly or sit independently below the panel frame |
| Bottom rail | Above the baseboard or lower edge | Reduces the clear height inside the panel opening |
| Panel opening | Between rails and stiles | Its proportions affect whether the panels look tall, square or wide |
| Top rail | Across the upper edge of the panel frame | Forms part of the finished wainscoting height |
| Chair rail / cap rail | At the visible top edge | Often becomes the horizontal line the eye reads as the wainscoting height |
This distinction matters when you compare examples online. Two rooms may both be described as having 36 in wainscoting, but one measurement may stop at the top rail while another includes a substantial cap profile. For your own project, pick one finished reference line and use it consistently around the room.
Best Wainscoting Height by Room
Room type changes the way the panelling is seen. A dining room has chairs, a table and often a strong formal axis. A hallway is narrow and viewed while moving. A living room may have a sofa, media unit, fireplace and several door openings competing with the top rail. That is why the same mathematical height can feel calm in one room and busy in another.
Room-by-room starting points
| Room | Useful starting approach | What should influence the final height |
|---|---|---|
| Dining room | Around one-third of wall height, sometimes slightly taller for a more formal look | Chair backs, table height, window sills, sideboards, door casing and any plate rail |
| Living room | Around one-third, adjusted to major furniture and architectural lines | Sofa backs, fireplace, media furniture, windows, radiators and switches |
| Hallway / entry | One-third is a safe start; a slightly taller treatment can suit narrow walls | Door casing, handrails, wall lights, coat storage and the visual length of the corridor |
| Bedroom / home office | Often looks calm at one-third or slightly lower | Headboard, desk, bedside furniture, sockets, switches and window levels |
| Powder room / WC | One-third to somewhat taller can work in a compact space | Basin, mirror, sanitary fittings, moisture exposure and easy-clean surfaces |
| Bathroom | Choose height by the actual wet-zone design rather than decoration alone | Bath, vanity, waterproofing, splash zones, wall tile and moisture-suitable materials |
| Stair / stair hall | Treat as a separate sloping layout | Stair pitch, landings, handrail, newel posts and the transition to horizontal walls |
Dining room: let the wainscoting organise the room
Dining rooms are where classic lower-wall wainscoting feels most at home. Start near one-third of the wall, then look at the sideboard, chair backs and window sills. If the room is tall and formal, moving the line a little higher can give the lower wall more presence. What matters is that the top rail looks intentional beside the other horizontal lines rather than almost—but not quite—matching them.
Living room: furniture matters more than a rule of thumb
In a living room, tape the proposed line behind the sofa and across the fireplace wall before deciding. A top rail that disappears halfway behind a sofa may be completely fine; one that sits two inches above it and creates a second competing stripe may look accidental. The room should be read as a whole composition, not as four independent walls.
Hallway and entry: repeated panels can make a long wall feel deliberate
A corridor is usually viewed from close range, so panel rhythm becomes very noticeable. Slightly taller wainscoting can work well because there is less furniture competing with it, but door casing and switches become critical. Keep the top line consistent through the hall unless a staircase or clear architectural break justifies a transition.
Bedroom and home office: calmer proportions often work better
Bedrooms and offices often benefit from a quieter lower-wall treatment. A one-third line usually leaves enough plain wall above for artwork, shelving or a headboard composition. If the room is small or the ceiling is low, pushing the panels toward half-height can make the upper wall feel squeezed unless that stronger effect is intentional.
Bathroom and powder room: design height and moisture strategy are separate decisions
A small powder room can carry surprisingly bold or tall panelling because the wall area is limited and the treatment is seen as a deliberate feature. A full bathroom needs more caution. The decorative height can still be chosen by proportion, but the material, substrate, joints, coating and waterproofing around wet areas must be suitable for the actual exposure. Standard MDF trim is not automatically a shower-wall system just because it has been painted nicely.
Do not use decorative wainscoting as a substitute for required waterproofing or moisture-resistant construction. In wet areas, follow the selected product system and the local requirements for the wall assembly.
Stairs: the top line usually follows the stair, not a horizontal tape line
Stair wainscoting is its own layout problem. The sloping cap typically relates to the stair pitch, and the transition at the top and bottom must be drawn before the panels are divided. Do not carry a horizontal 36 in line up the stairs and expect the geometry to resolve itself. Plan the sloping section, landing and adjoining horizontal walls as one composition.
When Should You Break the One-Third Rule?
The one-third proportion is useful because it gives you somewhere sensible to begin. It becomes less useful when it ignores stronger features already in the room. Moving the height is often better than forcing the trim through an awkward conflict just to preserve a mathematically pure ratio.
- A window sill sits only a small distance from the proposed top rail.
- A major door or built-in unit creates a stronger horizontal line.
- A radiator, vanity, desk or sideboard makes the proposed height look crowded.
- Existing historic trim gives the room a clear datum worth respecting.
- The room has unusually low or high ceilings.
- You intentionally want tall panelling for a more dramatic or enveloping effect.
- The treatment needs to meet a practical splash or protection zone, using materials suitable for that purpose.
- A staircase requires a sloping layout and a designed transition.
Avoid the awkward near-miss. If the top rail finishes only an inch or two from a window sill, switch plate or another strong trim line, test whether aligning with it or moving clearly away from it produces a cleaner result.
Mock Up the Height Before You Cut a Single Piece
The most useful design tool for wainscoting is not expensive software. It is painter's tape. Mark the proposed top line around the room and tape two or three sample stiles on the longest wall. Then step back, sit down, walk through the doorway and look at the room from the places where you will actually see it.
- Measure the finished wall height at several points.
- Mark the one-third height as the first candidate.
- Run painter's tape horizontally at that level.
- Add a few vertical tape strips to represent the planned stiles.
- Check doors, windows, switches, sockets, radiators, furniture and wall lights.
- Move the whole composition up or down if a conflict looks accidental.
- Leave the tape in place for a day if possible and view it in both daylight and evening lighting.
- Only after the height feels right should you finalise panel count and spacing.
Painter's tape can answer the question before timber or MDF gets involved
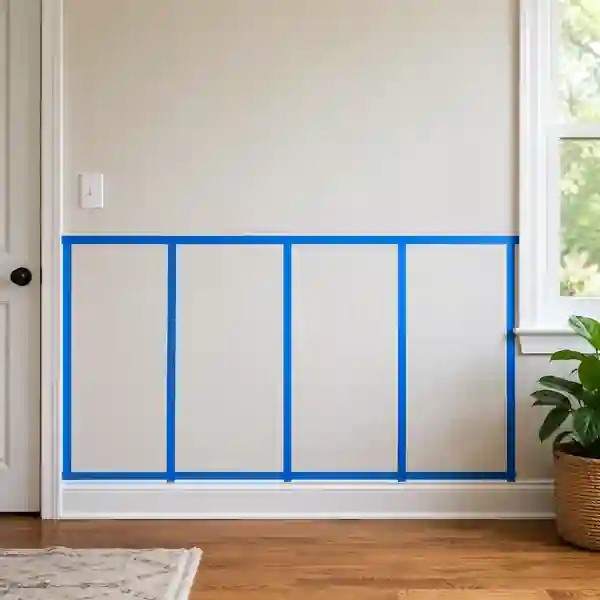
Tape the top line first and inspect it against windows, doors and furniture.
Add only a few vertical strips; you do not need to reproduce every panel to judge the overall rhythm.
View the wall from the doorway and from seated eye level, not only while standing next to it with a tape measure.
A small change at the mock-up stage costs almost nothing and can prevent an entire room of awkward trim.
How Wide Should Wainscoting Panels Be?
There is no universal panel width either. The goal is usually a repeated rhythm that suits the height and length of the wall without leaving a strange partial panel at one end. Begin with an approximate opening width that looks right, then adjust every panel equally so the measured wall is divided cleanly.
How panel width changes the visual effect
| Panel rhythm | Typical visual effect | Where it can work well |
|---|---|---|
| Narrower, more frequent panels | More vertical lines and a busier, detailed rhythm | Short walls, small rooms, traditional details or spaces with many interruptions |
| Medium-width panels | Balanced rhythm without too many stiles | Many dining rooms, living rooms, halls and general lower-wall layouts |
| Wider panels | Calmer and more contemporary appearance | Long walls, taller panels and rooms where fewer vertical lines are preferred |
| Very wide panels | Strong large-scale composition | Only when the proportions still work around doors, windows and furniture |
Choose a target width with your eyes, then let the arithmetic move it slightly. Five panels at 25.5 in each usually look much better than four perfect 30 in panels plus one narrow leftover strip that announces the calculation mistake from across the room.
The Equal-Panel Formula
For a framed run with a stile at both outside edges, the cleanest calculation subtracts the vertical trim first. If there are N panel openings, there are normally N + 1 stiles. Only the width left after those stiles are removed is divided into equal openings.
Stile count = panel count + 1

Exact clear panel width =
(wall width − stile count × actual stile width) ÷ panel count

Stile center-to-center spacing =
exact clear panel width + stile width
How wide should five wainscoting panels be on a 12 ft wall using 2.75 in stiles?
Answer: A 12 ft wall is 144 in wide. Five panels need six stiles. Six × 2.75 in = 16.5 in of vertical trim. The clear space is 144 − 16.5 = 127.5 in. Divide by five and each panel opening is exactly 25.5 in wide. The stile center-to-center spacing is 28.25 in.
Explanation: The trim has to be subtracted before the panel openings are divided. Dividing the whole wall by five would ignore the six stiles and the layout would not fit.
What is the metric result for a 3.6 m wall with six panels and 70 mm stiles?
Answer: The wall is 3,600 mm wide. Six panels need seven stiles, which occupy 490 mm. The remaining 3,110 mm divided by six gives equal clear panel openings of about 518.3 mm.
Explanation: Using millimetres makes the marking plan easy to transfer accurately. Keep the full decimal value in the calculation and round only to the precision you can measure consistently on site.
Equal spacing means subtracting the stiles before dividing the wall
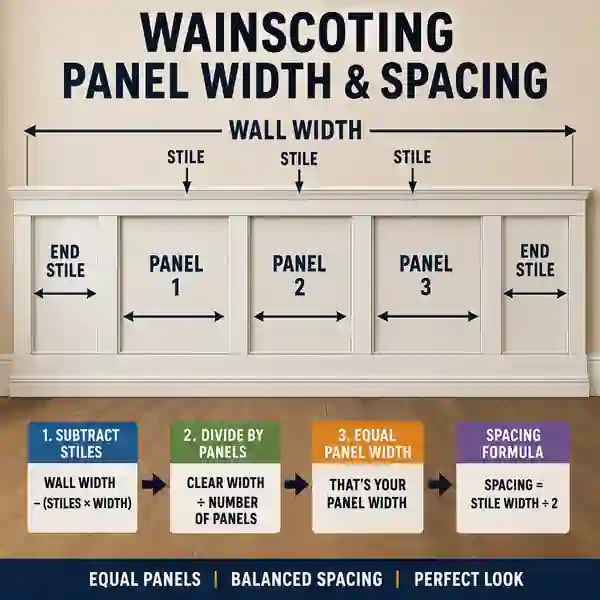
Five panel openings need six vertical stiles when the run is framed at both ends.
The actual stile face width is part of the wall width and must be subtracted.
Every clear opening should be recalculated to the same exact width.
Measure stile positions from one reference edge to reduce cumulative marking errors.
Should Wainscoting Panels Be Square?
No. Square panels can look good, but they are not a rule. The visible opening can be taller than it is wide, nearly square or deliberately wide depending on the wainscoting height, rail widths and wall length. The more important test is whether the repeated shapes look balanced in the room.
Panel proportions as a design check
| Opening proportion | Visual character | Planning note |
|---|---|---|
| Taller than wide | More vertical and traditional | Often suits taller wainscoting or narrow wall sections |
| Close to square | Orderly and balanced | Can work well in moderate-height lower-wall layouts |
| Wider than tall | Calmer and more horizontal | Useful on long walls when too many vertical stiles would feel busy |
A helpful method is to settle the height first, calculate the clear panel-opening height after the top and bottom rails are included, and then compare that with the proposed panel width. If the openings feel too narrow or too wide, change the panel count rather than distorting one end panel.
Doors, Windows, Outlets and Built-Ins Can Change the Layout
A long wall is not always one continuous design run. Full-height doorways, fireplaces, deep built-ins and large openings often act as visual breaks. In those cases, calculating each uninterrupted wall section separately usually produces a cleaner layout than subtracting all openings from one giant total and expecting the stiles to land gracefully.
- Use the finished casing or architrave edge as a possible boundary for a panel run.
- Check whether the outside stile should align with the casing or leave a deliberate margin.
- Treat a fireplace or full-height built-in as a separate composition unless the design clearly continues across it.
- Avoid placing a stile directly through an electrical box or switch plate.
- Keep enough trim width beside openings for clean cuts and finishing.
- Plan adjacent walls together when a corner is visible from the main entrance to the room.
The spacing calculation does not locate wiring or plumbing and does not make drilling or nailing safe. Check the wall before fixing trim, use appropriate detection and installation methods, and follow local electrical and building requirements.
Baseboard, Skirting and the Bottom of the Panel
Decide early whether the panel stiles die into the top of the existing baseboard or skirting, sit on a new bottom rail, or form part of a completely new trim build-up. The detail changes the clear panel height and can also change the material thickness needed so the vertical stiles do not project awkwardly beyond the base profile.
If the room also needs new baseboard or skirting, measure that run separately rather than treating the wainscoting trim total as the complete floor-level order. Door openings and fixed cabinetry interrupt the lower trim differently from the panel rhythm above.
Measuring the lower trim too? See when doorways should be subtracted from baseboard or skirting lengthPaint Can Make the Same Panel Layout Feel Lighter or Heavier
Height is not the only thing controlling visual weight. Dark wainscoting under a pale upper wall creates a strong horizontal base, while painting the panels and upper wall in closely related colours can make a tall treatment feel quieter. Gloss level, shadow lines and the depth of the rails and stiles matter too.
If the wainscoting will be painted, calculate paint from the actual surfaces and number of coats rather than from floor area. New MDF, timber, repaired plaster and previously painted walls can need different preparation and primer systems.
Planning the finish too? Use the room paint guide for wall area, coats and product coverageCommon Wainscoting Height and Spacing Mistakes
Mistake, what it causes and a better approach
| Mistake | What usually goes wrong | Better approach |
|---|---|---|
| Copying 36 in or 900 mm from another room | The proportion feels too tall or too short for the actual ceiling | Start from the finished wall height, then adjust |
| Ignoring the cap or chair rail in the height | The finished visible line ends higher than planned | Measure to the true finished top of the assembly |
| Choosing height before checking windows and switches | Trim collides with existing features | Tape the line around the real room first |
| Dividing the full wall by the panel count | The stile widths are forgotten and the final panel does not fit | Subtract every stile before dividing the openings |
| Starting with exact 24 in or 600 mm panels | The last opening becomes a narrow leftover strip | Use a target width, then equalise every panel |
| Measuring each bay from the previous one | Small errors accumulate across the wall | Reference all stile marks from one edge |
| Treating a doorway as if the panel rhythm continued invisibly through it | Panels land awkwardly beside casing | Calculate natural wall sections separately |
| Installing before testing the visual proportion | A mathematically correct layout still looks wrong | Use painter's tape and view the room from normal positions |
Worked Example: A 9-Foot Dining Room
Example room and wall
| Input | Value | Planning note |
|---|---|---|
| Ceiling height | 9 ft / 108 in | One-third gives a 36 in starting height |
| Chosen finished wainscoting height | 36 in | After checking window sill, switches and sideboard |
| Wall section | 12 ft / 144 in | Measured between finished boundaries |
| Actual stile width | 2.75 in | Use the installed face width, not the nominal product name |
| Panel count | 5 | Chosen after a tape mock-up |
- One-third of the 108 in wall height gives 36 in, so that becomes the first tape line.
- The tape line clears the switch plates and sits comfortably below the window sill, so the 36 in finished height is retained.
- Five panel openings require six stiles.
- Six stiles at 2.75 in use 16.5 in of the 144 in wall.
- The remaining clear width is 127.5 in.
- 127.5 ÷ 5 = 25.5 in clear width per panel.
- The center-to-center spacing between equal stiles is 25.5 + 2.75 = 28.25 in.
- The first, last and middle stiles are marked with tape before the full cut list is prepared.
Nothing in this example makes 36 in or five panels universally correct. The value comes from this wall: a 9 ft ceiling, the actual room features and a 12 ft uninterrupted section. Change the ceiling, wall length, stile width or openings and the better layout may change with them.
Frequently Asked Questions
Is 36 inches a standard wainscoting height?
It is a common dimension, especially around 9 ft ceilings, but it is not a universal standard. Use the finished wall height and the real room features to decide whether 36 in is appropriate.
How high should wainscoting be with an 8-foot ceiling?
One-third of an 8 ft wall is 32 in, so about 30–34 in is a sensible area to test visually for a classic lower-wall treatment. Taller designs can still work, but they should be intentional rather than copied from a taller room.
How high should wainscoting be with a 9-foot ceiling?
One-third of 9 ft is 36 in. That makes 36 in a strong starting point, then the top line can be adjusted to suit windows, doors, furniture and the intended style.
How high should wainscoting be with a 10-foot ceiling?
One-third of 10 ft is 40 in. A taller room can usually carry a taller lower-wall treatment without looking compressed, but mock up the actual line rather than treating 40 in as mandatory.
Should wainscoting be the same height in every room?
Not necessarily. Connecting spaces often look better when a continuous sight line is maintained, but rooms with different ceiling heights, windows or functions can justify different heights. If the rooms are visible together, test the transition from the doorway before changing the line.
Does wainscoting height include the baseboard or skirting board?
For design planning, use the finished visible height from the floor to the top of the wainscoting assembly. Whether the baseboard is structurally separate or integrated into the panel frame, it still sits within the lower-wall composition seen by the eye.
How wide should wainscoting panels be?
There is no single best width. Choose an approximate panel opening that looks proportional to the height and wall length, then calculate a whole panel count and make every opening equal. A balanced final width is usually more important than preserving an exact target dimension.
What if the wall does not divide evenly into the panel width I want?
Do not leave the final panel narrower. Change the panel count or slightly adjust the target width so the available clear space is divided equally after all stiles are subtracted.
Can wainscoting be half the wall height?
Yes. Half-height panelling creates a stronger, more dramatic horizontal division than the classic one-third approach. It can work well when that effect suits the room, but it should be mocked up carefully in spaces with low ceilings because the upper wall may feel compressed.
Is chair rail height the same as wainscoting height?
It can be when the chair rail or cap rail forms the top of the wainscoting. If the chair rail is separate from the panel assembly, treat the visible relationship between the two lines as part of the design rather than assuming they must match.
Final Layout Check Before Cutting Trim
- The wall height was measured to the finished floor and ceiling levels.
- The proposed wainscoting top line was tested at roughly one-third of the wall height.
- Windows, doors, switches, sockets, radiators, furniture and wall lights were checked.
- The finished top of the cap or chair rail is included in the chosen height.
- Each uninterrupted wall section has a clear start and end boundary.
- The actual stile width is known.
- The panel count creates equal openings with no narrow leftover panel.
- Panel proportions look balanced after the top and bottom rails are included.
- Stile marks are referenced from one consistent edge.
- The complete layout was mocked up with tape before the material was cut.
- Fixings, adhesives, wall condition and hidden services have been checked separately from the geometry.
- Material quantities include a sensible allowance and a real stock-length cutting plan.
The best wainscoting height is not the number that appears most often online. It is the line that makes sense in your room. Start near one-third of the wall, check the actual architecture and furniture, tape the result in place, and then let equal-panel maths solve the horizontal layout. That sequence keeps the design human first and mathematical second—which is exactly where the calculator is most useful.
If you remember only one thing, remember this: choose the height with the whole room in view, but calculate the spacing from the exact wall measurement. Your eye can forgive a panel being 25.5 in instead of the 24 in you originally imagined. It is much less forgiving of one lonely 11 in panel squeezed into the corner.