
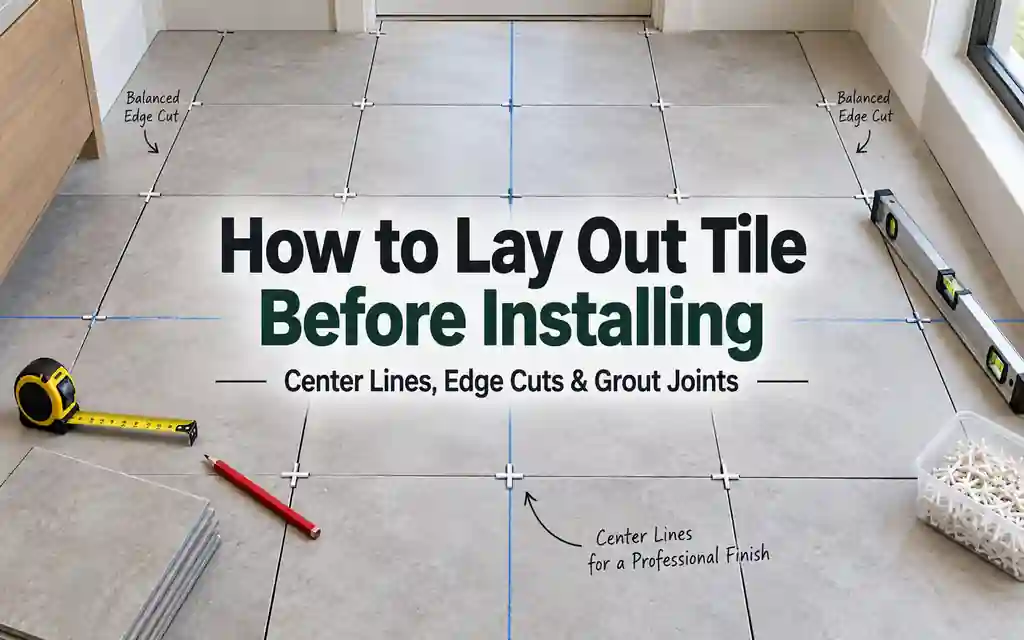
Tile can be perfectly level, well bonded and beautifully grouted yet still look wrong because the layout was never planned. The problem usually appears at the edges: a 25 mm sliver along one wall, a grout line that misses the centre of a doorway, or a row that starts neatly at one side and slowly exposes how crooked the opposite wall really is.
The cure is not to begin from the nearest wall and hope. Before installing the first tile, treat the room as a measured tile field. Establish reliable reference lines, include the grout joint in the geometry, compare a tile-centred layout with a grout-joint-centred layout, and dry-check the result against doors, visible walls and fixed features.
Quick answer: find the centre of the usable tile field, snap two square reference lines, then test two layouts on each axis—one with a tile centred on the line and one with a grout joint centred on it. Choose the version that gives sensible, balanced edge pieces without creating a worse cut at the doorway or another focal point.
In North America you will usually see layout, grid and centerline. In the UK, Ireland, Australia and other markets, setout or setting out is also common. In this guide, they describe the same planning job: deciding exactly where the tile grid will sit before anything is bonded.
Plan the grid before the first tile becomes permanent
A Tile Layout Is a Grid, Not a Starting Wall
A straight tile installation is a repeating grid made from tile faces plus grout joints. The walls are boundaries around that grid, but they are not automatically trustworthy reference lines. Rooms can taper, corners can be out of square, plaster can wander and a long wall can be visibly bowed. If every row simply follows the first wall, the error may be carried across the whole floor.
Questions to answer before you snap the final lines
| Question | Why it matters | Typical consequence if ignored |
|---|---|---|
| Where is the room actually viewed from? | The entrance and longest sightline often matter more than geometric centre alone. | A balanced room can still show an ugly sliver at the doorway. |
| Are opposite walls parallel? | A rectangular drawing does not prove the built room is rectangular. | One edge cut can grow wider from one end of the wall to the other. |
| What is the actual tile size? | Nominal sizes such as 12 × 24 in or 300 × 600 mm may not equal the measured face. | The planned grid can drift over several rows. |
| What grout joint will be used? | The joint is part of the repeating module. | Ignoring it can move the last row by a surprisingly large amount. |
| Are there movement joints or structural breaks? | Some joints must be accommodated through the tile assembly. | A visually convenient grid can conflict with the construction requirement. |
Measure the Usable Tile Field, Not Just the Room
The tile field is the surface the grid actually has to cover. On a simple floor it may be the clear wall-to-wall rectangle. In a kitchen it can stop at fixed cabinetry, continue under removable appliances or pass through a doorway. On a wall it may be bounded by a worktop, ceiling, shower tray, window or trim profile. Decide those boundaries before calculating the layout.
- Measure each relevant dimension in more than one place when walls are uneven.
- Record the narrowest and widest distance if the room tapers.
- Mark door openings, recesses, columns, islands, floor drains and fixed cabinets on a sketch.
- Confirm whether tile continues into adjoining spaces or stops at a threshold.
- If a perimeter movement gap has already been specified for the system, account for it before calculating the usable field.
Think in terms of the usable field
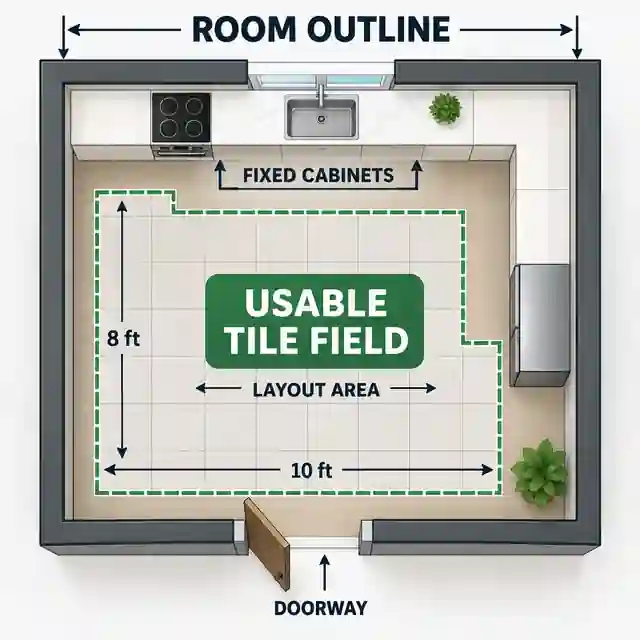
The room outline and the tile field are not always the same shape.
Fixed cabinetry, thresholds and transitions can create natural boundaries for the grid.
A doorway may be only a small part of the area, but it is often the first part people see.
Measure the field that the tiles must actually cover, then test the result against the surrounding room.
Find the Centre, Then Check Whether It Deserves to Stay There
For a rectangular tile field, the geometric centre is a useful starting point because it gives both sides an equal opportunity to produce balanced cuts. Mark the midpoint of the length and width, then create two perpendicular reference lines through those points. These are planning lines, not a commandment that the finished grid must remain exactly centred.
Field centre along each axis = usable field dimension ÷ 2

Start by testing the grid from these centre lines.
Then compare the resulting edge pieces and visible focal points.
The centre becomes useful only after you see what it does. If it gives two generous edge pieces, good. If it gives two identical 30 mm slivers, symmetry has merely produced two matching problems. A half-module shift may keep the layout balanced while turning those slivers into much wider cuts.
Centerline Through a Tile vs Centerline Through a Grout Joint
There are two obvious centred phases for a straight grid. In one, the room centreline passes through the middle of a tile. In the other, it passes through the middle of a grout joint. The two grids are offset by roughly half a tile module, so the edge cuts can be dramatically different even though both layouts are perfectly centred.
The two centred phases
| Layout phase | What sits on the centreline | When it may be useful |
|---|---|---|
| Tile-centred | The middle of a tile face | Often works well when a central full tile is visually desirable or gives wider perimeter pieces. |
| Joint-centred | A grout joint between two tiles | Often improves edge cuts when tile-centred would leave narrow slivers. |
| Mixed by axis | Tile-centred in one direction and joint-centred in the other | Completely valid when the best cuts differ between length and width. |
One room, two centred layouts, very different edges
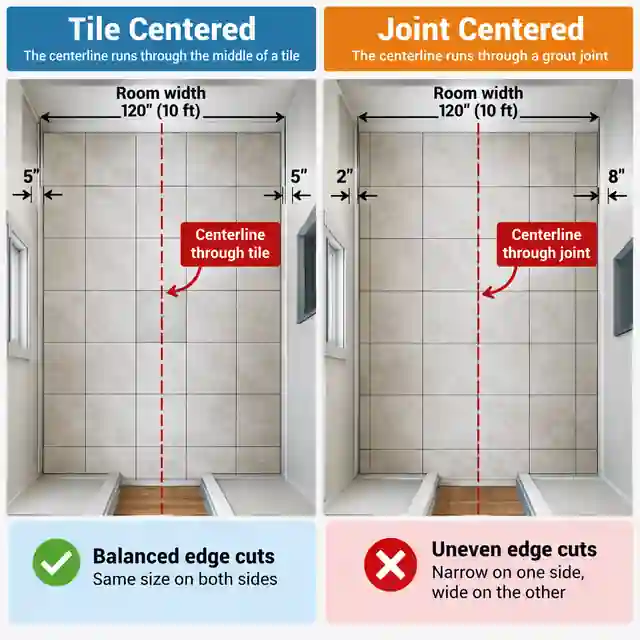
The top diagram centres a full tile on the room axis.
The lower diagram shifts the same grid by half a module so a grout joint sits on the axis.
Both are symmetrical, but the perimeter cuts are different.
Choose the phase that produces the better overall room, not the one that sounds more mathematically pure.
Dry-Lay the Grid Before You Trust the Calculator
A calculator or drawing can place the grid accurately, but the real tiles still get the final vote. Dry-lay a row in each direction with the intended spacers or accurately measured joint gaps. This confirms the actual tile dimensions, reveals shade or size variation and lets you stand in the doorway to judge the cuts before adhesive turns the discussion into demolition.
- Mark the proposed reference lines.
- Place a dry row of tiles across the field with the real grout spacing.
- Check the last piece at both ends.
- Repeat in the perpendicular direction.
- Compare tile-centred and joint-centred phases if either edge is narrow.
- Rotate rectangular tile 90° and compare again when direction is not fixed.
- Look from the main entrance and other normal viewing positions.
- Only then snap or lock in the final control lines.
Dry layout is not wasted time. It is the last stage where moving the entire floor by 80 mm requires a pencil rather than a breaker and a vocabulary upgrade.
The Grout Joint Is Part of the Layout
A repeated tile module is not just the tile face. Between neighbouring tiles there is a grout joint, and those joints accumulate across the room. Ten rows contain nine internal joints. Twenty rows contain nineteen. Ignoring a 3 mm or 1/8 in joint can move the projected edge by several centimetres or more across a large field.
Approximate repeating module = tile face dimension + grout joint

Across N tile positions:
occupied dimension = N × tile face + (N − 1) × grout joint
What happens with 24 in tiles and a 3/16 in grout joint across six tile positions?
Answer: Six 24 in tile faces occupy 144 in. Five internal 3/16 in joints add another 15/16 in. The six-position field therefore occupies 144 15/16 in before any edge gap or cut is considered.
Explanation: The individual joint looks small, but the layout repeats it. Leaving joints out of the maths can turn a promising edge cut into an unexpected sliver.
What happens with six 600 mm tiles and 3 mm grout joints?
Answer: Six tile faces occupy 3,600 mm. Five internal joints add 15 mm, so the repeated field occupies 3,615 mm before the perimeter is considered.
Explanation: Metric and imperial layouts follow exactly the same rule: count the spaces between tiles as well as the tiles themselves.
Choose the Grout-Joint Width Before Finalising the Grid
Grout-joint width is not only a colour or style choice. The tile type, dimensional variation, edge finish, substrate, application and manufacturer instructions all matter. Rectified porcelain can often support a tighter visual joint than a tile with more size variation, but 'rectified' does not mean 'install with no joint'. Confirm the permitted joint for the exact product and system before locking the layout.
What can affect grout-joint width
| Factor | Why it matters to layout | What to verify |
|---|---|---|
| Tile dimensional variation | A very narrow joint leaves less room to absorb small size differences. | Measure several tiles and check the product specification. |
| Rectified vs non-rectified edges | More precisely finished edges can support a different visual joint. | Do not assume the word rectified overrides the manufacturer's minimum. |
| Large-format tile | Warpage and lippage become more noticeable as joints narrow. | Check product flatness, offset limits and substrate requirements. |
| Wet or exterior use | Movement, drainage and exposure can change the complete joint system. | Follow the approved installation method for the location. |
| Grout product | Different grout materials have their own permitted joint ranges. | Check the grout data sheet before installation. |
Do not design the room around a zero-width grout line. Real tile has manufacturing tolerances and the finished assembly must accommodate installation and movement requirements. Use the tile and grout manufacturers' current specifications for the exact products.
Avoid Sliver Cuts Without Inventing a Universal Rule
A sliver cut is a very narrow strip at the edge of the tile field. It can look accidental, be difficult to cut cleanly and leave a fragile piece beside a wall, threshold or trim. There is no single edge-piece percentage that is correct for every tile and room, but the basic design goal is simple: if a modest grid shift can replace a tiny strip with a generous cut, test the shift.
- Compare tile-centred and joint-centred layouts before accepting a narrow edge.
- Rotate rectangular tile 90° when orientation is flexible.
- Check whether the smallest cut occurs on the most visible wall or at the doorway.
- Do not improve one wall by creating an even worse strip on the opposite side.
- Remember that a cut hidden behind cabinetry may matter less visually than a threshold cut in direct view.
- If the room tapers, check the width of the edge piece at both ends of the wall.
Balanced cuts beat perfect-looking maths with tiny edges
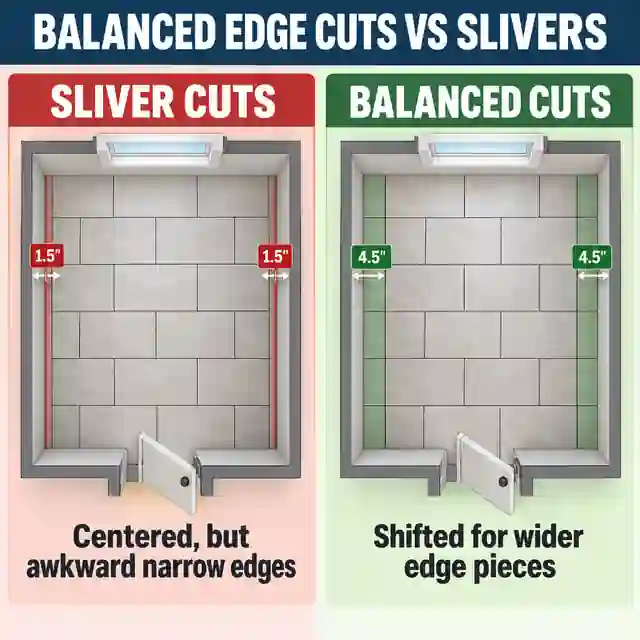
The first layout is centred but leaves very narrow strips at both walls.
The second shifts the phase by half a module and produces wider edge pieces.
The goal is not to maximise one edge in isolation; it is to improve the complete room.
Treat a sliver threshold as a warning to review the grid, not as proof that the project needs a magic percentage.
The HomDera Tile Layout Calculator uses a user-adjustable sliver warning threshold, with 33% as a planning default. That is a comparison tool, not an industry minimum. It helps flag narrow pieces so you remember to review them against the real room, tile strength, cut method, trim and installation detail.
If the Room Is Not Square, Keep the Grid Square
A common mistake is to make the tile follow two walls that are not perpendicular. The result is a grid that cannot stay square. Instead, establish reference lines that are square to each other and let the perimeter cuts absorb the room's imperfections. This keeps the grout lines straight through the main field.
- Choose the main baseline that best serves the room or connected area.
- Mark a perpendicular line using a reliable square, laser or geometric check.
- Verify the angle over the longest practical distance.
- Measure from the grid to each wall at several points.
- Check how the changing wall distance affects the edge cuts.
- If one wall is visibly dominant, consider a small grid adjustment while keeping the reference lines square.
How can you check a right angle without a giant square?
Answer: Use a 3-4-5 triangle or any exact multiple of it. Mark 3 ft along one reference line and 4 ft along the other; the diagonal between those marks should be 5 ft. Metric works the same way—for example 600 mm, 800 mm and 1,000 mm.
Explanation: The 3-4-5 relationship creates a right triangle. Using a larger multiple improves the practical check because small marking errors become less significant over a longer distance.
Square the grid, then let the cuts reveal the crooked wall
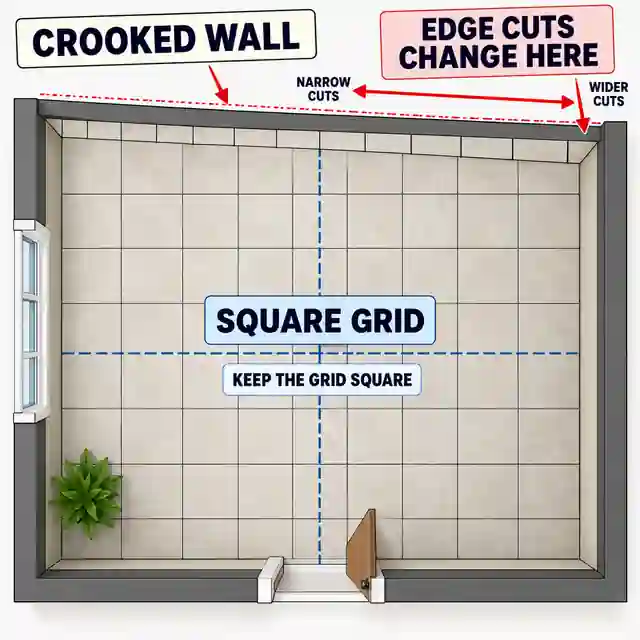
The central grout lines remain straight and perpendicular.
A tapered wall is handled by perimeter cuts rather than by twisting the whole grid.
Measure the edge width at both ends of a long wall before cutting the first row.
If the taper is visually severe, plan where it will be least noticeable.
Doorways and Focal Lines Can Matter More Than Geometric Centre
People normally enter a room through a doorway, not through the geometric centre of the floor. A centred grid that leaves a 35 mm cut directly across the threshold may look worse than a slightly shifted grid with a clean doorway and two still-reasonable perimeter pieces. The same principle applies to fireplaces, island centre lines, vanities and prominent windows.
When a focal feature deserves a layout check
| Feature | What to inspect | Possible response |
|---|---|---|
| Main doorway | Tile or grout alignment through the opening and cut width at the threshold | Shift the grid slightly if it improves the entrance without creating bad opposite cuts. |
| Kitchen island | Whether long grout lines feel aligned or awkward beside the island | Use the island as a visual check, not automatically as the only centre. |
| Vanity or bath | Cuts beside the visible front edge and around exposed sides | Prioritise the exposed area while respecting waterproofing and movement details. |
| Fireplace or feature wall | Whether a joint or tile centre aligns with the visual axis | Test the room-centred and feature-centred options side by side. |
| Long corridor | Whether lines continue straight into the distance | Use a master reference line rather than restarting the grid at each doorway. |
Connected Rooms Need One Master Plan
When the same tile flows through a kitchen, hall and living space, centring every room independently can create broken grout lines and awkward transitions. Treat the connected area as one project first. Choose a master orientation and reference line, then check how that grid lands in each secondary space.
- Decide which room or sightline controls the main grid.
- Carry control lines through door openings before installation reaches them.
- Check whether a natural threshold allows a deliberate layout break.
- Review cuts in narrow corridors because small errors are visually amplified there.
- Do not hide a required structural or movement joint merely to preserve a decorative grid.
- Where different tile formats meet, design the transition instead of expecting the modules to coincide by accident.
Movement joints are part of the tile assembly, not an optional decoration. Existing structural or movement joints and required perimeter or field joints must be handled according to the approved installation system. Do not bridge or relocate them simply because another grout line would look nicer.
Wall Tile Uses the Same Logic With Different Focal Lines
On walls, the same grid principles apply, but the eye often cares more about a vanity, window, niche, shower control or visible outside corner than about the exact centre of the entire wall. Establish a level horizontal datum and a plumb vertical reference, then compare the cuts around the features people will actually see.
- Check whether the wall ends with a full tile, trim profile or cut edge.
- Avoid a tiny strip beside a highly visible outside corner when the grid can reasonably be shifted.
- Plan niches from the tile module when possible so grout lines and cuts look intentional.
- Do not assume the worktop, shower tray or ceiling is perfectly level.
- Use a level datum and measure the first row or cut row from it.
- For multiple walls in a shower, review the wrap around inside corners before setting the first wall.
Wall layout follows the feature, not blindly the plaster
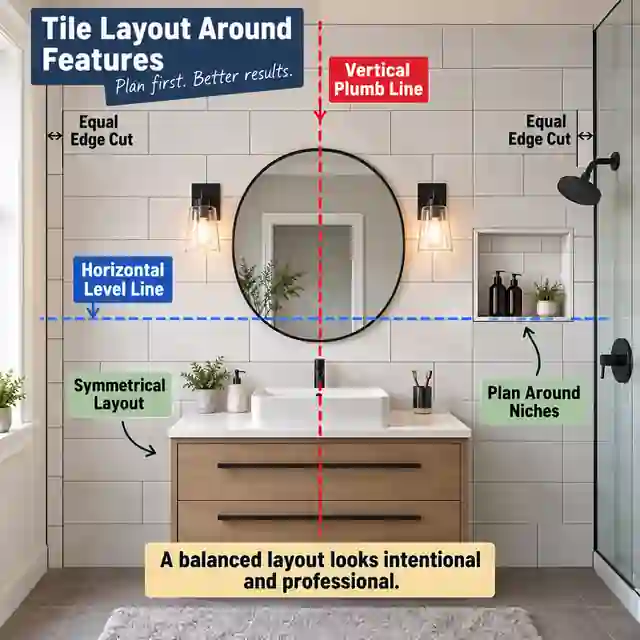
The vanity centre, niche and exposed edge are checked against the proposed grid.
A level datum prevents a sloping floor or worktop from pulling the tile rows out of level.
Visible edge cuts are compared before the first row is bonded.
The grid can remain square and level even when the surrounding construction is not.
Large-Format Tile Makes Small Layout Errors More Obvious
With large tiles there are fewer joints across the room, so each tile position carries more visual weight. A slightly uneven substrate, a poor offset or a narrow joint can make lippage and alignment problems more noticeable. The layout therefore has to be considered together with tile flatness, substrate flatness and the manufacturer's permitted pattern.
Large-format layout checks
| Check | Why it matters | Practical action |
|---|---|---|
| Substrate flatness | Large tiles bridge more surface area and show highs and lows clearly. | Correct the substrate before trying to solve flatness with extra layout adjustment. |
| Tile warpage | Long rectangular pieces can have slight curvature. | Dry-check faces and follow manufacturer limits for offsets. |
| Running-bond offset | Placing the high centre of one tile beside the low end of another can emphasise lippage. | Use the offset approved for the exact tile rather than assuming 50% is suitable. |
| Narrow grout joint | There is less visual room for dimensional variation. | Verify product tolerances and the permitted joint width. |
| Edge cuts | One narrow strip may represent a large percentage of an expensive tile. | Compare orientation and centre phase before cutting. |
The current TCNA Handbook includes guidance on grout-joint sizes, patterns, substrate conditions and workmanship. For large-format or technically demanding installations, use the current product instructions and applicable local standards rather than copying a generic layout from a photo.
Straight-Grid Planning Does Not Cover Every Pattern
The HomDera Tile Layout Calculator is intentionally a straight-grid tool. It compares centred phases, tile orientation, grout joints and edge pieces for a rectangular field. Herringbone, diagonal, basketweave, modular patterns, mosaics, curved rooms and sloped shower floors need additional geometry and often a physical mock-up.
- Diagonal layouts create triangular edge cuts and usually more waste.
- Herringbone depends on the exact module and border treatment.
- Mosaic sheets add sheet joints that must visually blend with the joints inside each sheet.
- Sloped shower floors must follow drainage geometry before decorative symmetry.
- Curved boundaries need templates or site-specific cutting plans.
- Mixed tile sizes should follow the manufacturer's or designer's repeat pattern.
Worked Example: 24 × 12 in Tile in a 12 × 10 ft Room
How would you plan a 12 ft × 10 ft rectangular floor using 24 × 12 in tile with a 3/16 in grout joint?
Answer: First measure the real tile field and verify that the reference lines are square. Enter the field as 12 × 10 ft, the tile as 24 × 12 in and the joint as 3/16 in. Compare tile-centred and grout-joint-centred phases in both directions, then rotate the tile 90° and compare again. Review the smallest edge piece and the cuts at the doorway. Dry-lay a row with actual spacers to confirm the chosen grid before snapping the final control lines.
Explanation: The useful result is not simply the orientation with the fewest pieces. The better layout is the one that keeps the grid square, avoids unnecessarily narrow perimeter cuts and works with the room's visible entrance and fixed features.
Common Tile Layout Mistakes
Mistake, result and better approach
| Mistake | What goes wrong | Better approach |
|---|---|---|
| Starting with a full tile against the first wall | The opposite wall may receive a tiny sliver. | Test the complete field before setting the first row. |
| Centred means finished | Two identical bad cuts are accepted because they are symmetrical. | Compare tile-centred and joint-centred phases. |
| Ignoring grout joints in the maths | The grid drifts as repeated joints accumulate. | Include every internal joint in the module. |
| Following a crooked wall | Grout lines carry the wall error across the floor. | Keep the reference grid square and cut the perimeter. |
| Planning only from above | The doorway or main sightline gets the worst cut. | Stand where the room is normally viewed and inspect the dry layout. |
| Using nominal tile size | The projected edge position can be wrong over many rows. | Measure representative tiles and use current product data. |
| Choosing joint width after layout | Changing the joint changes the entire grid. | Set the approved joint before final calculations. |
| Forcing the same centre phase both ways | One axis gets narrow cuts unnecessarily. | Use tile-centred on one axis and joint-centred on the other if it works better. |
| Bridging movement joints for appearance | The assembly may be unable to accommodate movement. | Respect the approved movement-joint design. |
| Skipping the dry check | Real tile variation appears only after adhesive is spread. | Dry-lay enough pieces to confirm the plan. |
Frequently Asked Questions
Tile layout FAQ
| Question | Short answer |
|---|---|
| Should tile always start in the centre of the room? | No. The centre is a strong starting point for testing a layout, but doorways, focal features, connected rooms and edge cuts can justify a controlled shift. |
| Should a tile or grout line be centred? | Test both. The two phases are offset by roughly half a tile module and can create very different perimeter cuts. |
| How small is too small for an edge cut? | There is no universal percentage for every project. Treat narrow slivers as a warning and compare alternative phases, orientation and focal points. |
| Do grout joints count in tile layout? | Yes. Internal grout joints are part of the repeated grid and must be included in the total occupied dimension. |
| What if the walls are not square? | Keep the reference grid square and let perimeter cuts absorb the wall variation rather than twisting the field. |
| Can I start with a full tile at the doorway? | Sometimes, but check what that decision does to the rest of the room. A clean threshold is useful only if it does not create much worse cuts elsewhere. |
| Can I use the same method for wall tile? | Yes for the basic grid logic, but wall layouts often prioritise vanities, niches, windows, trim and level or plumb reference lines. |
| Does the Tile Layout Calculator plan herringbone? | No. It is designed for a straight rectangular grid. Herringbone, diagonal and other patterns require different geometry. |
A successful tile layout is not the one with the cleverest centreline. It is the one that still looks intentional when you reach the walls, doorway, corners and adjoining rooms. Measure the real field, make the grid square, include the grout joints, compare both centred phases, inspect the smallest cuts and dry-lay the real tile before anything becomes permanent.
Plan your tile grid with the HomDera Tile Layout Calculator