
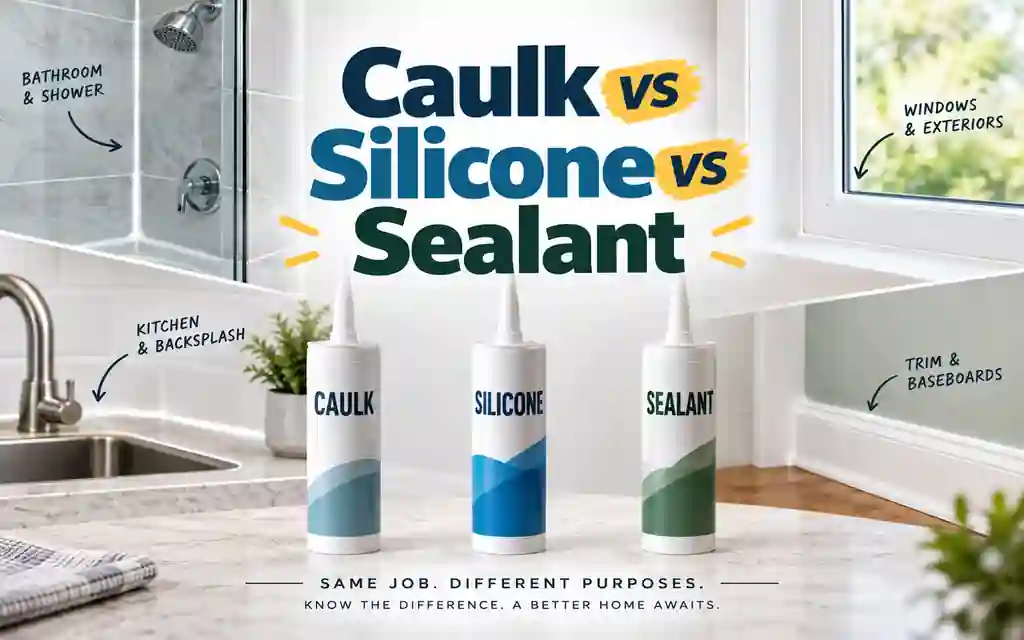
Walk into the sealant aisle and the labels can make a simple job feel oddly technical. One tube says caulk, another says 100% silicone, another says kitchen and bath, and a fourth promises to be paintable, waterproof, flexible and suitable for almost everything. The awkward part is that several of those claims can be true at the same time—just not for the same joint.
For most home projects, the safest way to choose is by the job rather than by the marketing word. A tiny paintable gap along a baseboard, a shower corner, an exterior window perimeter and a movement joint may all need a bead from a cartridge, but they do not ask the material to do the same thing. This guide compares the common choices in plain English and shows where each one makes sense.
Quick answer: use a paintable acrylic or paintable hybrid for small interior gaps in trim and molding; use a kitchen-and-bath product designed for wet areas around tubs, showers and sinks; use a weather-rated flexible sealant around exterior windows and doors; and treat true movement joints as specified sealant details rather than ordinary cosmetic caulking.
Terminology varies by market. In North America, “caulk” is common for household gap filling and finishing. In the UK, Ireland, Australia and other markets, “sealant” and “sanitary silicone” are more common. “Mastic” is also used regionally, but it can mean different products, so the product chemistry and intended application matter more than the nickname.
Choose the joint first, then choose the tube
Caulk vs Silicone vs Sealant at a Glance
Fast comparison for common home projects
| Material family | Best strengths | Typical home uses | Main caution |
|---|---|---|---|
| Acrylic latex caulk | Easy tooling, water clean-up, usually paintable | Baseboards, skirting, trim, molding, small interior gaps before painting | Usually not the first choice for constantly wet or high-movement joints |
| 100% silicone | Excellent water resistance, flexibility and weather resistance | Tubs, showers, sinks, tile, glass and many exterior joints when the product is approved | Traditional 100% silicone is generally not paintable |
| Siliconized acrylic / latex | Paintability with better flexibility and moisture resistance than basic painter's caulk | Interior trim, kitchens, bathrooms and general sealing when the label allows | Performance varies widely between formulations |
| Paintable hybrid sealant | Higher flexibility and weather resistance with paintability on many products | Windows, doors, trim and moisture-prone areas that also need paint | Do not assume every hybrid suits every substrate or wet area |
| Polyurethane or other high-performance construction sealant | Strong adhesion and movement capability for demanding joints | Exterior building joints, concrete, masonry and selected window/door details | Can be harder to tool, may require primer and may not suit sanitary or decorative work |
First: Caulk and Sealant Are Categories, Not One Chemistry
The words on the front of a cartridge do not tell you enough by themselves. “Caulk” may be acrylic latex, siliconized latex or another flexible compound. “Sealant” is broader and may describe silicone, polyurethane, hybrid polymer or specialist products. Even “silicone” needs care: a cartridge can be 100% silicone, or it can be an acrylic product modified with silicone, or a modern hybrid designed to combine silicone-like performance with paintability.
What to read on the label before choosing
| Label detail | Why it matters | Example question |
|---|---|---|
| Chemical base | Tells you whether the product is acrylic, silicone, polyurethane, hybrid or another chemistry | Is this actually 100% silicone or just silicone-modified acrylic? |
| Interior / exterior rating | Shows the environmental exposure the product is designed to handle | Can it tolerate UV, rain and temperature cycling? |
| Paintability | Avoids discovering that paint beads or peels from the cured surface | Can this bead be painted with the finish I plan to use? |
| Wet-area / water exposure rating | Separates decorative gap filling from products designed for repeated moisture | Is it approved around tubs, showers or sinks? |
| Movement rating | Shows whether the cured material is intended to stretch and compress with the joint | Is this a static trim gap or a moving exterior joint? |
| Substrate compatibility | Some sealants can stain stone, attack coatings or bond poorly to certain plastics or metals | Will it bond to both sides of this joint without damage? |
Acrylic Latex Caulk: Best When Paint and Easy Finishing Matter
Acrylic latex caulk is the classic choice for small interior gaps that will be painted. It is easy to apply, usually smooths with simple tools, cleans up with water before curing and accepts paint on products labelled paintable. That makes it especially useful where trim meets a wall and the bead is part of the finished paint line rather than a permanent wet-area joint.
- Baseboard or skirting gaps against painted walls
- Crown molding or coving transitions where the product is suitable
- Door and window casing on the interior side
- Small cracks at trim joints before painting
- Low-movement decorative gaps in drywall, plaster and painted woodwork
100% Silicone: Best Where Water and Flexibility Matter More Than Paint
Traditional 100% silicone is valued because it stays flexible, handles water well and adheres strongly to many non-porous surfaces such as glass, ceramic and glazed tile when the formulation is appropriate. Kitchen-and-bath silicone is commonly formulated for sanitary areas, while window-and-door silicone is formulated for weather exposure. Those are not automatically interchangeable, even when both are silicone.
- Tub and shower perimeter joints when the product is approved for wet areas
- Connections between tile and sanitary fixtures
- Sink and countertop joints where the selected product is compatible
- Glass shower screens and many glazed surfaces
- Exterior window and door perimeter joints when using a weather-rated formulation
Siliconized Acrylic and Paintable Hybrids: The Middle Ground
Siliconized acrylic and newer hybrid products exist because many real joints want more than one property at once. A bathroom backsplash may need moisture resistance but also paintability. An exterior trim joint may need weather resistance yet still disappear under paint. These products can be extremely useful, but their performance is product-specific: one may be rated for a shower, another only for damp interior trim, and another for exterior windows and siding.
Do not choose a product because the label contains the word silicone somewhere. Read the full application list. “100% silicone”, “siliconized acrylic” and “paintable silicone hybrid” can behave very differently after curing.
Bathrooms: Use the Joint's Water Exposure to Decide
Bathrooms contain several different environments in one small room. The bead around a shower tray sees direct water and cleaning. A vanity backsplash sees splashes. Painted trim outside the wet zone mostly sees humidity. Treating all three joints as identical is how the wrong tube ends up in the shower simply because it was already open.
Bathroom sealant choices by location
| Location | Good starting choice | What to confirm |
|---|---|---|
| Inside shower corners and changes of plane | Wet-area silicone or another approved flexible sanitary sealant | Tile system requirements, movement-joint detail, mold resistance and compatibility |
| Tub or shower tray to wall | Kitchen-and-bath silicone or approved sanitary sealant | Adhesion to the fixture and wall finish, water-ready time and joint movement |
| Basin to countertop | Sanitary sealant compatible with both materials | Natural stone, solid-surface, metal and coated finishes may need specific chemistry |
| Backsplash to countertop | Flexible kitchen-and-bath sealant; paintable hybrid if painting is required | Movement between the counter and wall finish |
| Painted baseboard or trim outside wet zones | Paintable acrylic or hybrid | Humidity tolerance and paint compatibility |
| Pipe penetrations and specialist waterproofing details | System-specified product | Do not improvise where the waterproofing manufacturer specifies a component |
A visible bead is not the bathroom waterproofing system. Silicone can seal a finished joint, but it does not replace the membrane, backer board, tray detail, flashing or other concealed waterproofing required behind the finish.
One bathroom, several different sealant jobs
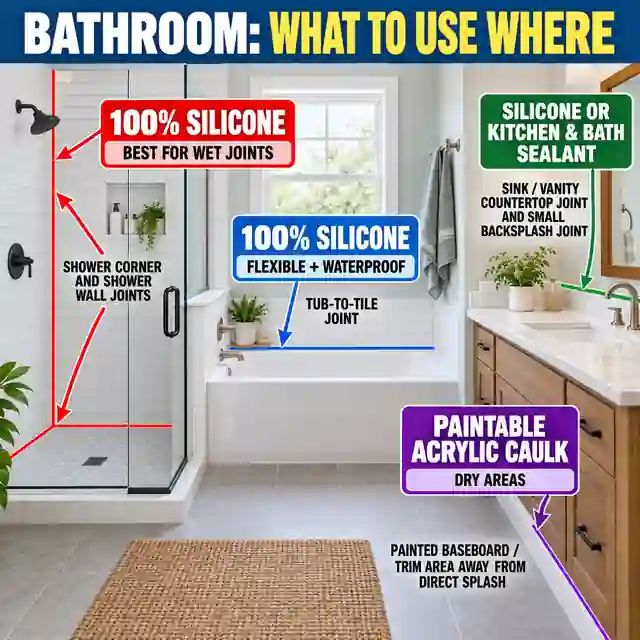
Direct-wet joints around a shower or tub need a product explicitly designed for repeated water exposure.
Countertop and basin joints need compatibility with both adjoining materials, especially natural stone or coated surfaces.
Painted trim outside the splash zone usually benefits more from paintability than from maximum silicone performance.
The best bathroom product is selected by the exact joint—not by buying one cartridge for the whole room.
Kitchens: Moisture, Heat, Grease and Surface Compatibility All Matter
Kitchen joints are rarely submerged, but they deal with splashes, wiping, grease and movement between different materials. The joint behind a sink is more demanding than a tiny painted trim gap at the top of a cabinet. Around a cooktop, temperature and manufacturer clearances matter as well, so a general-purpose household sealant should not be assumed suitable near hot appliances.
Kitchen applications and practical choices
| Joint | Typical choice | Check before applying |
|---|---|---|
| Sink to countertop | Kitchen-and-bath silicone or compatible sanitary sealant | Countertop material, sink material, cleaning products and movement |
| Countertop to backsplash | Flexible kitchen-and-bath sealant; paintable hybrid where needed | Colour, paintability and compatibility with stone or tile |
| Cabinet or trim to painted wall | Paintable acrylic or hybrid | Whether the joint will move and whether it will be painted |
| Around plumbing penetrations | Product suitable for the surface and exposure | Do not block drainage, access or manufacturer-required openings |
| Near cooktops or ovens | Only a product rated for the actual temperature and location | Appliance instructions and required non-combustible clearances |
Natural stone deserves its own compatibility check. Some sealant chemistries can stain or discolour porous stone. Use a product specifically approved for the stone type and, when appearance is critical, test an inconspicuous sample first.
Windows and Doors: Interior Finishing and Exterior Weather Sealing Are Different Jobs
The neat paint line around interior casing is not the same joint as the exterior perimeter between a window frame and the building envelope. Interior trim often needs a small paintable bead. Exterior perimeter joints must tolerate rain, UV exposure, temperature changes and movement between different materials. Some window systems also rely on intentional drainage paths that must remain open.
Interior vs exterior window and door sealing
| Location | Priority | Typical starting product |
|---|---|---|
| Interior casing to painted wall | Paintability and clean finish | Paintable acrylic or hybrid caulk |
| Interior frame gap with air leakage | Air sealing plus compatibility with finishes | Appropriate flexible air-sealing product for the actual gap |
| Exterior frame perimeter | Weather resistance, UV stability and movement | Exterior window-and-door sealant or system-specified product |
| Masonry-to-frame joint | Movement and adhesion to porous and non-porous surfaces | High-performance sealant with primer/backing if required |
| Factory drainage or weep path | Keep drainage functioning | Do not seal unless the window manufacturer instructs you to |
A good window joint is more than a bead on the surface
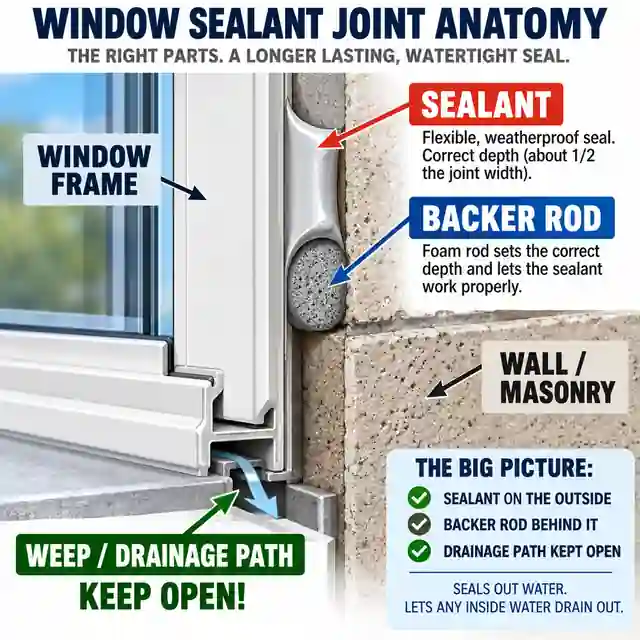
Exterior perimeter sealant must bond to compatible surfaces on both sides of the joint.
Backer rod can control depth and prevent unwanted three-sided adhesion in joints designed for it.
A thick blob filling the entire cavity is not automatically stronger than a properly proportioned joint.
Weep holes and designed drainage routes must remain open when the window system depends on them.
For exterior windows and doors, treat the product data sheet as part of the installation. Check substrates, primer requirements, minimum joint dimensions, maximum joint size, movement capability and application temperature instead of relying only on the words “exterior” or “weatherproof” on the front label.
Trim, Baseboards and Molding: Paintability Usually Wins
Small gaps where painted trim meets a painted wall are where ordinary paintable caulk earns its keep. The goal is not to create a structural joint. It is to hide hairline irregularities, stop dark shadow lines and let the final paint finish read as one clean assembly. A highly glossy non-paintable silicone bead can solve the gap and create an entirely new finishing problem at the same time.
- Use a paintable product when the bead will be covered by the wall or trim finish.
- Do not use caulk to disguise large carpentry errors that should be scribed, filled or rebuilt.
- Keep beads small; large triangular ridges remain visible even after painting.
- Allow the product to reach its stated paint-ready time before coating.
- For moving trim joints, choose a product with enough flexibility rather than the cheapest painter's caulk available.
Grout vs Silicone: Why Tile Corners Need Special Attention
Grout and flexible sealant do different jobs. Grout fills the regular joints between tiles and creates a continuous finished surface. Changes of plane—such as wall-to-wall, wall-to-floor or tile-to-tub transitions—can move differently from the flat tile field. Many tile systems therefore use a flexible sealant at movement and perimeter joints rather than treating every corner as just another grout line.
Grout and flexible sealant are not interchangeable
| Location | Usually needs | Reason |
|---|---|---|
| Tile-to-tile joint on one flat plane | Grout specified for the tile system | Creates the regular finished joint between tiles |
| Wall-to-wall inside corner | Flexible sealant where required by the tile system | Two planes can move relative to each other |
| Wall-to-floor perimeter | Flexible movement/perimeter joint where specified | Floor and wall assemblies may move differently |
| Tile-to-bathtub or shower tray | Wet-area flexible sealant | Fixture movement and direct water exposure |
| Structural or designed movement joint | Specified movement-joint sealant system | Requires controlled geometry and performance, not cosmetic caulk |
Choose the Product With Five Questions
- Will the joint be dry, humid, splashed, directly wet or outdoors?
- How much will the two sides of the joint move relative to each other?
- Must the cured bead be painted?
- What are the two substrates—paint, tile, glass, wood, stone, metal, plastic, masonry or something else?
- Does the manufacturer explicitly list this application and these substrates in the current product data?
Paintability: Never Assume From Colour Alone
White does not mean paintable, and clear does not mean waterproof. Traditional 100% silicone normally rejects conventional paint, while acrylic latex is commonly designed to be painted. Modern hybrid and paintable-silicone products blur the old rule, which is why the product label matters more than a generic internet statement about “silicone”.
Paintability by common product family
| Product family | Usually paintable? | Practical note |
|---|---|---|
| Basic acrylic latex | Yes, when labelled paintable | Common choice for interior trim and wall gaps |
| Siliconized acrylic / latex | Often yes | Check paint-ready time and approved paint types |
| Traditional 100% silicone | Usually no | Choose the finished bead colour carefully because paint may not adhere |
| Paintable silicone hybrid | Yes on products specifically designed for it | Follow the stated paint-ready time and coating compatibility |
| Polyurethane / construction sealant | Varies | Some are paintable, some require a cure period or specific coatings |
Movement and Flexibility: The Joint Can Fail Even When the Bead Looks Perfect on Day One
Buildings move. Timber changes with moisture, metal frames expand and contract with temperature, countertops and tubs can deflect slightly, and exterior materials may move at different rates. A sealant joint must stretch and compress without losing adhesion or tearing. This is why exterior and designed movement joints are often specified by movement class and joint geometry rather than by a simple instruction to “apply caulk”.
Do not use a cosmetic caulk guide to design an expansion or movement joint. Width, depth, backing material, primer, adhesion area and movement capability must come from the selected sealant system or project specification.
Surface Compatibility: The Best Sealant Is Useless If It Will Not Bond
A cartridge can be excellent and still be wrong for one of the materials in the joint. Some plastics are difficult to bond, some metals react badly with certain cure chemistries, porous stone can stain, and dusty masonry can defeat adhesion before the material has a chance to perform. Read both the “adheres to” list and the limitations in the technical data sheet.
Compatibility checks before application
| Surface | What can go wrong | Better check |
|---|---|---|
| Painted drywall or plaster | Weak or dusty paint layer releases from the wall | Seal only to sound, clean coatings |
| Ceramic / porcelain / glass | Residue or cleaner prevents adhesion | Degrease and prepare exactly as instructed |
| Natural stone | Staining or edge darkening | Use a stone-approved non-staining product |
| Metal | Corrosion, poor adhesion or coating incompatibility | Check the exact metal and finish |
| Plastic / PVC / acrylic fixtures | Plasticizer or low surface energy reduces adhesion | Confirm the exact substrate and primer requirement |
| Concrete / masonry | Dust, moisture or incorrect primer causes bond failure | Prepare the joint and use the specified primer/backing system when required |
Joint Size and Backer Rod: More Sealant Is Not Always Better
For larger rectangular joints, sealant depth is often controlled with backer rod rather than filling the entire cavity. The backing supports tooling, limits material volume and helps prevent three-sided adhesion so the sealant can move between the two intended bond faces. The correct rod type, diameter and sealant depth depend on the joint and product system.
Why backer rod changes the way a movement joint works
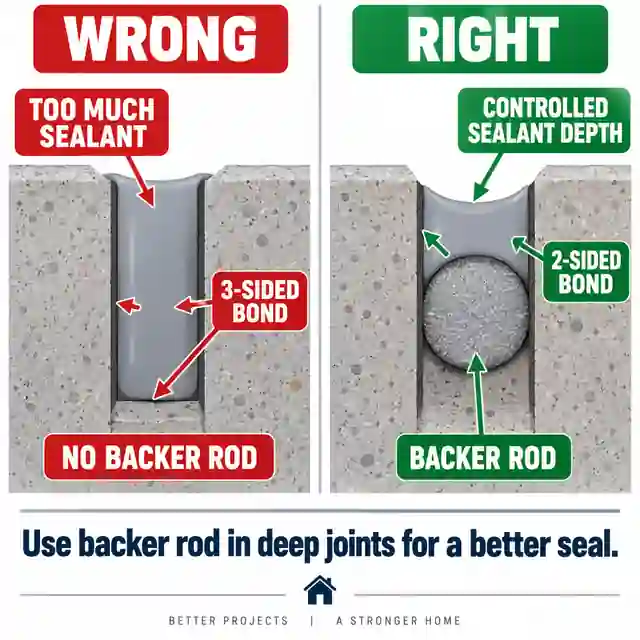
The sealant should normally bond to the two side faces rather than being locked to the bottom of a designed movement joint.
Backer rod controls depth and gives the fresh sealant support during tooling.
A deep cavity can consume several times more material without improving performance.
The required width-to-depth ratio is product-specific; use the selected manufacturer's detail for the real joint.
If a gap is large enough to make you wonder whether you should simply keep pumping in more sealant, stop and check the joint detail. The answer may be backer rod, bond-breaker tape, a repair material or a different construction detail—not a heroic cartridge count.
How Much Caulk or Sealant Do You Need?
Coverage changes dramatically with bead size. A cartridge that runs a long distance as a fine trim bead can disappear quickly in a wider window joint. For a controlled rectangular joint, material volume comes from length × width × depth. For a triangular corner fillet, the cross-section is roughly half of an equivalent rectangle. Always use the actual package volume and add a practical allowance for starts, tooling and irregular joints.
Why can two 30 ft joints use very different numbers of cartridges?
Answer: Because joint length is only one dimension. A 1/8 in × 1/8 in bead has one quarter of the cross-sectional area of a 1/4 in × 1/4 in bead. If both joints are the same length, the larger square section needs roughly four times the material before any allowance is added.
Explanation: This is why a single “linear feet per tube” number is useful only when the bead dimensions are also known. Joint geometry controls material volume.
How to Apply Caulk or Sealant So the Product Has a Chance to Work
- Remove failed material instead of hiding it under a fresh surface bead.
- Clean the substrates of dust, grease, soap residue, loose paint and contaminants using methods approved for the surfaces.
- Let the joint reach the moisture condition required by the product—many sealants want a clean, dry surface, while a few modern formulas permit damp application.
- Install backer rod, primer or bond-breaker material when the joint design requires it.
- Cut the nozzle to suit the intended bead rather than opening it as wide as possible.
- Apply a continuous bead while pushing material into contact with both sides of the joint.
- Tool within the product's working time to improve contact and create the intended profile.
- Remove masking tape before a skin locks it into the edge of the bead.
- Protect the joint from water, paint, dust and movement until the stated cure or service-ready time is reached.
Dry Time, Cure Time, Paint-Ready and Water-Ready Are Not the Same Thing
A bead can skin over quickly and still be soft inside. Product labels may list tack-free time, paint-ready time, rain-ready or water-ready time and full cure time separately. Temperature, humidity and bead thickness can change those times. The safest rule is to follow the actual cartridge or technical data sheet instead of assuming that a product is ready because the surface no longer feels wet.
If the shower needs to be used tonight, choose the product based on its documented water-ready time before you start—not by negotiating with uncured sealant after installation.
Common Caulk and Sealant Mistakes
What goes wrong and what to do instead
| Mistake | What usually happens | Better approach |
|---|---|---|
| Using one all-purpose tube everywhere | Good performance in one joint, premature failure in another | Choose separately for wet areas, paintable trim and exterior movement |
| Applying new material over failed caulk | Poor adhesion and an oversized messy bead | Remove loose or contaminated material and prepare the surfaces |
| Using non-paintable silicone on trim that will be painted | Paint beads, crawls or peels | Use a paintable acrylic or approved paintable hybrid |
| Grouting every tile corner | Cracking can appear at changes of plane | Use the flexible movement/perimeter joint required by the tile system |
| Filling a deep movement joint solid | Excess material and poor joint geometry | Use the specified backing and controlled sealant depth |
| Sealing window weep holes | Water cannot drain as designed | Keep manufacturer drainage routes open |
| Ignoring natural-stone compatibility | Permanent staining may appear at the edge | Use a non-staining stone-approved sealant |
| Making the bead huge to feel safer | More mess, slower cure and no guarantee of better movement | Use the dimensions recommended for the joint and product |
| Using the room too soon | Water, paint or cleaning damages the uncured bead | Respect the stated service-ready time |
Frequently Asked Questions
Can I use 100% silicone on painted trim?
You can use silicone only when it is compatible with both surfaces and you do not need conventional paint to adhere to the cured bead. For ordinary painted baseboards, skirting, casing and molding, a paintable acrylic or paintable hybrid is usually easier to finish cleanly. If you need silicone-like performance and paintability, choose a product specifically sold and documented as paintable.
Should shower corners be grouted or sealed with silicone?
Changes of plane in tiled wet areas commonly use a flexible sealant rather than ordinary field grout, but the exact detail should follow the tile, waterproofing and movement-joint system used on the project. Match the sealant to the surfaces and wet-area exposure, and do not use the visible bead as a substitute for concealed waterproofing.
Can I caulk over old caulk or silicone?
A thin cosmetic touch-up may occasionally be allowed by a specific compatible product system, but failed, loose, moldy or contaminated sealant should normally be removed so the new bead can bond to sound surfaces. New material applied over weak old material inherits the old layer's adhesion problem.
Final Caulk, Silicone and Sealant Check
- The joint location and water exposure are clear.
- The two substrates are identified and listed as compatible with the product.
- The product is approved for interior, exterior or wet-area use as required.
- Paintability has been checked before choosing the bead colour and finish sequence.
- Expected movement is within the selected product's intended use.
- Natural stone, specialty metals, plastics and coated surfaces have been checked for staining or adhesion limitations.
- Old failed material, soap residue, dust and loose coatings have been removed.
- Backer rod, primer or bond-breaker requirements have been checked for larger or moving joints.
- The real joint length, width and depth have been measured for the quantity estimate.
- The package size on the actual cartridge, tube or sausage has been used in the order calculation.
- Paint-ready, water-ready and full cure times are understood before the area returns to service.
- Window weep holes, drainage paths and manufacturer-required openings have not been accidentally sealed.
The simplest way to remember the choice is this: painted trim usually wants paintability, showers want wet-area performance, exterior windows want weather resistance and movement capability, and designed movement joints want a real sealant detail. Choose the job first, then the chemistry. The cartridge becomes much less confusing once you know what the joint is actually asking it to do.